Last update: 2025-08-03
Wwise Adventure Game Audio Integration Guide
My favourite assignment in assessing my students' Wwise integration knowledge is the creation of an own version of the Wwise Adventure Game sound. Being both the original Wwise and Unity projects available as a reference and having all Wwise programming part still integrated in the game, it's easy to take on the audio editor role and make a new own integration from scratch, so we can practice all the concepts learnt from Audiokinetic's 101 and 201 official lessons applied to Cube. This also allows sound designers and composers to try their own audio tracks in the game, while we can focus the integration and use the original assets if required.
This guide provides some short examples of each basic concept we must deal with in the process, trying to address some ideas that might be confusing for beginners that have been learning from 101 and 201 materials. Please note this is a very basic guide and won't cover all what should be done to get a high degree in the assignment.
Index
- Requirements
- Playing a single sound
- Creating a new project
- Importing a single audio file
- Creating an event to play a single sound
- Setting up the required soundbank
- Generating the SoundBank and replacing Wwise Adventure Game sound with our own integration
- Setting up 3D positioning
- Integrating Game Parameters (RTPC)
- Integrating impact SFX (nested Switch Containers)
- Integrating a simple loop (Credits)
- Integrating a loop with intro segment (Main Menu)
- Interactive music (Gameplay)
- Integrating Stingers
Sound Design
Interactive Music
Requirements
We need to have the following actions done before start working in our new project:
- Create an Audiokinetic account
- Install the Wwise Launcher
- Install the Wwise Authoring Tool (I like to stick to the newest version or the same installed in your school)
- Install Wwise Adventure Game sample
- Play the Wwise Adventure Game to get familiar with it
- Get Wwise Audio Design Stub document I'm usually providing with the assignment
Playing a single sound
My recommendation to start any Wwise project (not only educational ones!) is try to integrate a single sound into the game. This way we can make sure we're putting the events into the right soundbanks, generating the right soundbanks at the right place, sticking to the names provided by the documents. Once this is working, we'll just have to add new content.
The main reference we'll use to integrate new sounds into the game is the Wwise Adventure Game Audio Design Stub document. There we have all the details about the events sent by the game alongside other game syncs we can use to play the right sounds when required. We also have the details about the soundbanks that should hold the events and the directories where we must put the soundbanks we create, so we can play the game with our own sounds and check everything is working as expected.
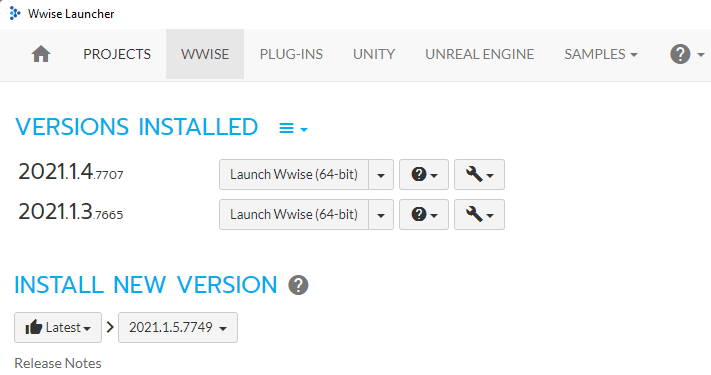
- Launch Wwise from the Wwise Launcher clicking the Launch Wwise (64-bit) button.
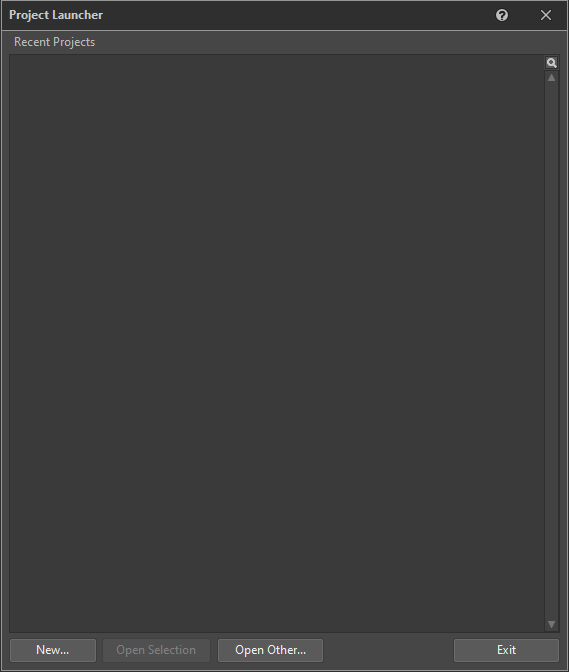
- Create a project clicking the New button.
- Enter a project name in the Name text box and choose the path you want to save your project to in Location. This will create a folder with that name. The project is the folder itself with all its contents.
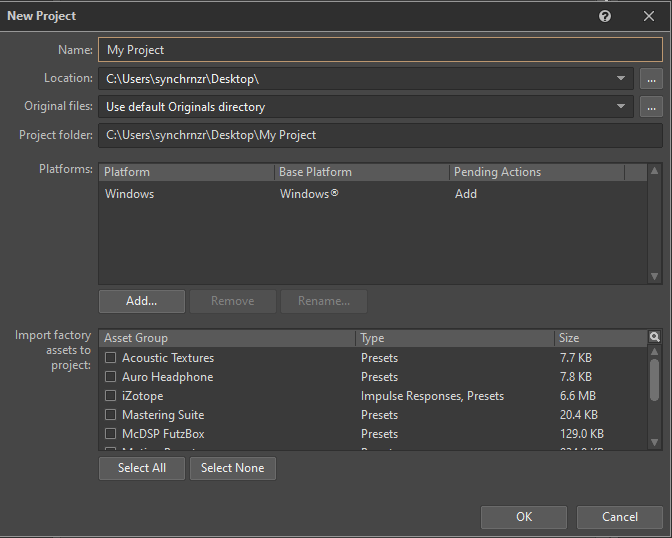
- NOTE: It's advisable to uncheck all asset groups in the Import factory assets to project section (Select none button), so the project is totally clean and will avoid confusion.
- NOTE for MacOS users: in MacOS environments, working with projects stored in portable USB drives might fail, so it's better to work with a copy in the internal hard drive and, if you need to take your project with you, then copy the project folder to your USB drives.
Tap the OK button when you're done.
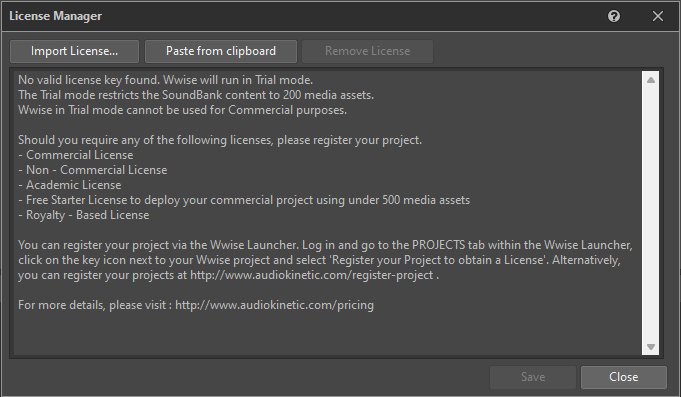
- You'll get a License Manager warning saying you've got no valid license for this project. If you have one, you can copy it and click the Paste from clipboard button. I'm usually providing an academic license to my students so they can work with 500 assets instead of just 200. For now we could just continue with the Trial mode, so click the Accept button when you're done
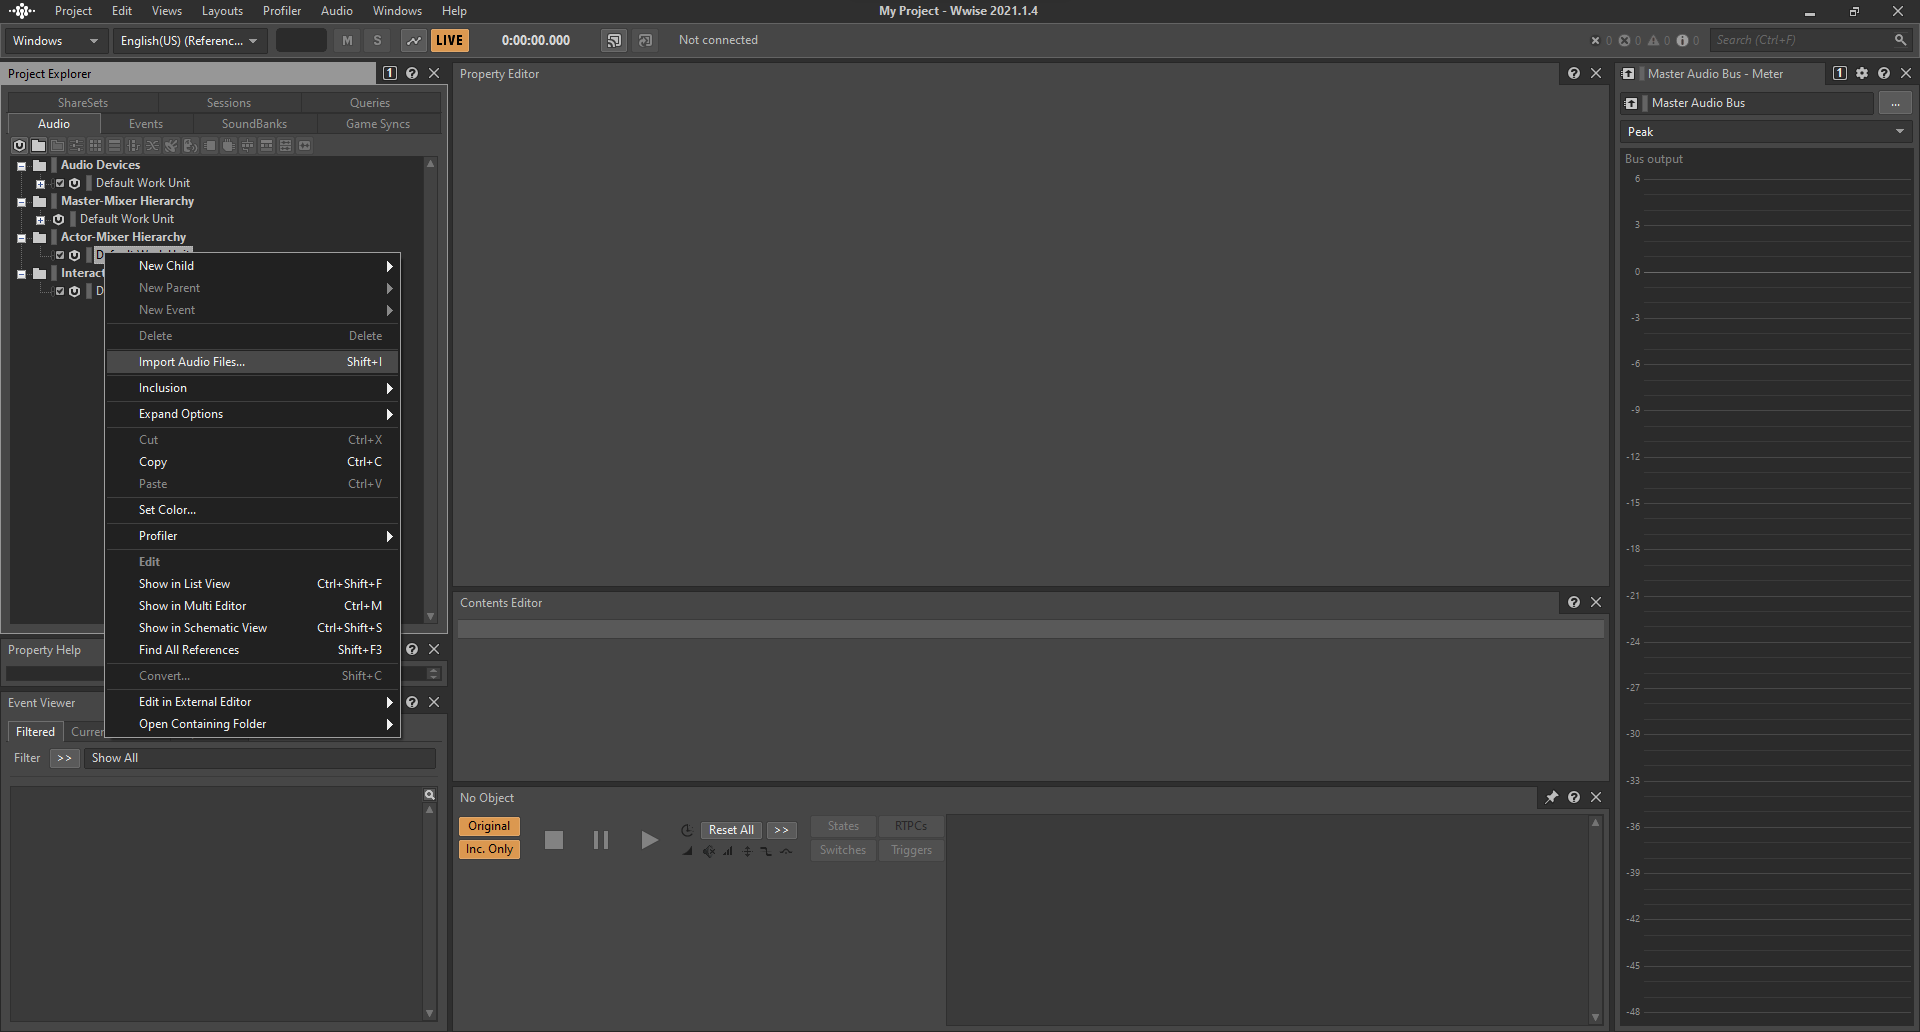
- Wwise will open into the Designer layout, which is the most common layout to add music and sound assets to the project. We can import any sound by right-clicking on the Default Work Unit from the Actor-Mixer Hierarchy. We can also import audio files by clicking on the Default Work Unit and choosing Project > Import Audio Files from the main menu.
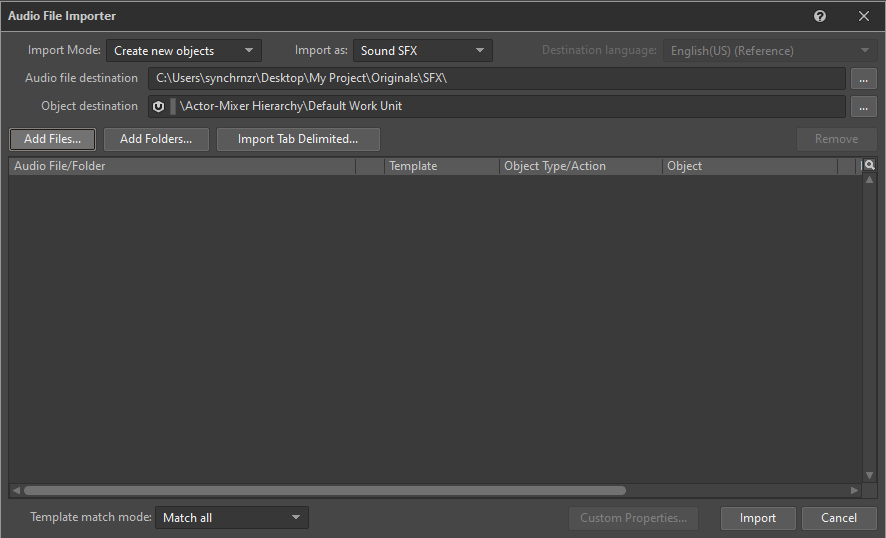
- The Audio File Importer dialogue will allow us adding either single files or entire folders with all their subfolder hierarchy. In this example we're just importing a single sound, so we'll click the Add files... button. I'll import the day version of the Village ambience loop.
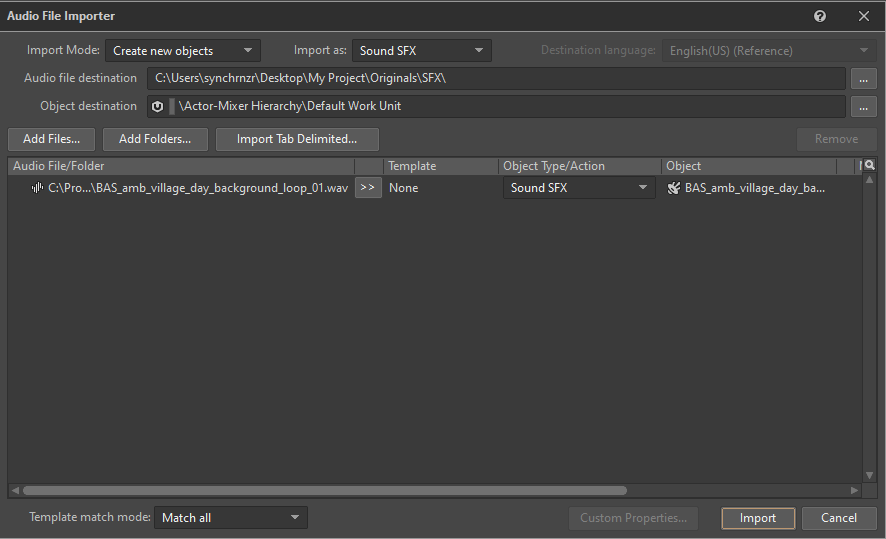
- After selecting the file you'll see it in the b>Audio File Importer dialogue, you can now click Import so it will be added to the Actor-Mixer Hierarchy.
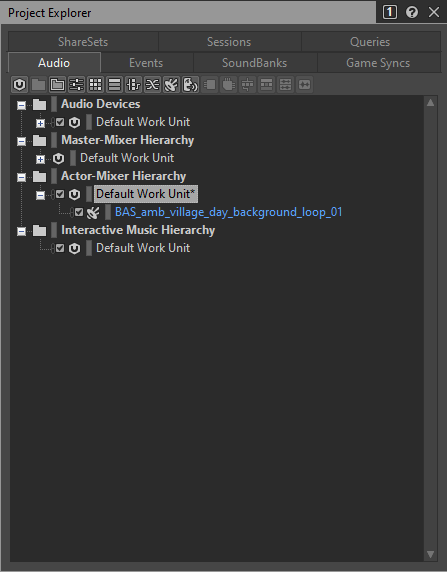
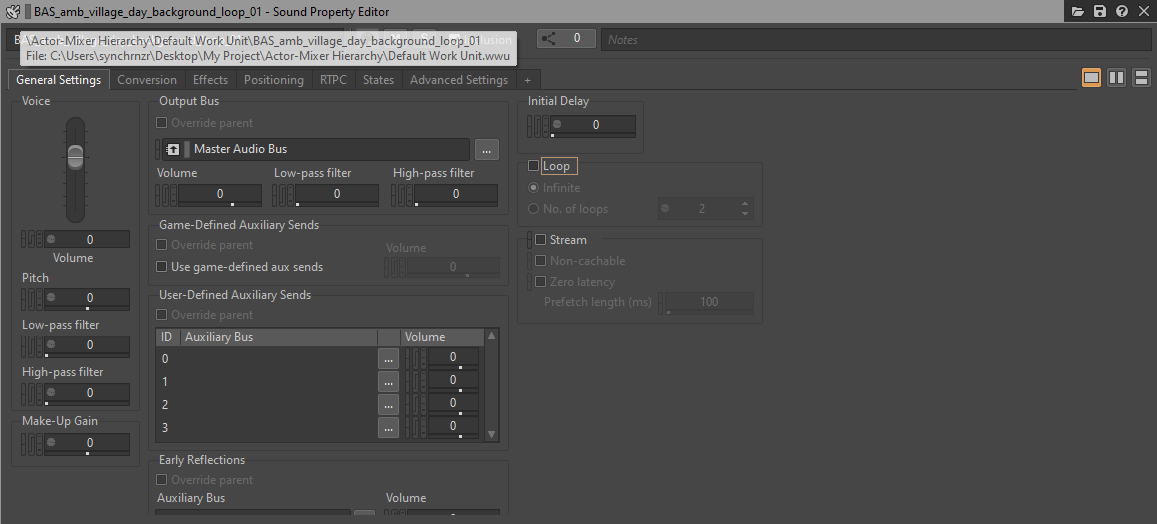
- Click in the + button before the Actor-Mixer Hierarchy icon to unfold it. You should see the imported sound in blue. You can play it by selecting it and using the Play and Stop buttons in the Transport Control view. Be sure to stop it: you cannot make any change to the project while a sound is playing, those options will be disabled. As this sound is a loop, we'll also want to enabled the Loop checkbox in the General Settings tab of the Sound Property Editor.
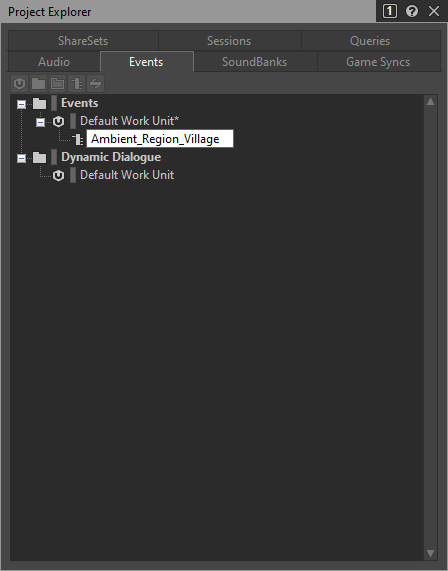
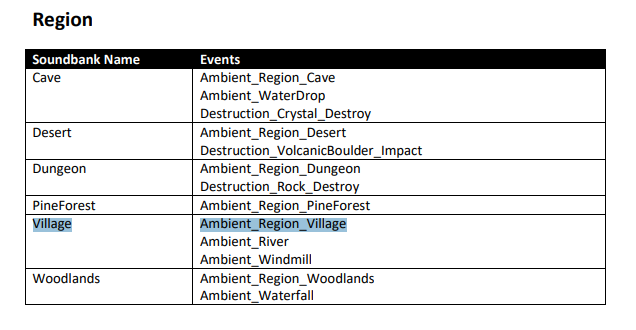
- Now we must instruct Wwise to play our sound when the game throws the corresponding event. We'll switch to the Events tab in the Project Explorer view, right-click the Default Work Unit and click New Child > Event. Easiest, you can click the Create new 'event' button (the 4th one at the toolbar):The name of the event sent by the game is found in the Wwise Adventure Game Design Stub doc I'm providing with the assignment - ALL event, game sync, soundbank, etc... names are specified there:
 I'm always suggesting to copy & paste the event name, so we're always sure there's no typo. We could also copy the name manually but any wrong character in the name will mean the sound won't be triggered. Wwise is not case sensitive, but making a mistake in the name is very easy. Sometimes names are mispelled or wrong written, have confusing characters like an uppercase i and a lowercase l... Copy & paste is safest whenever we can do it.
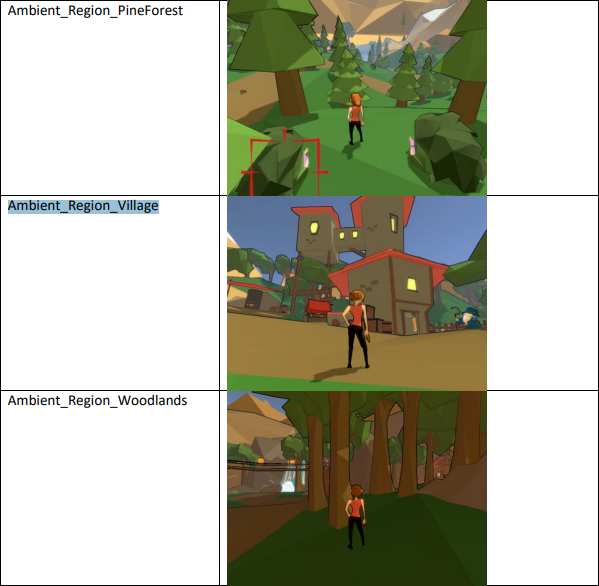
- Events execute a list of actions we can set up in the Event Property Editor view. We could click the Add >> button to add a Play action and browse the sound we want to play, but we'll do it like pros. Doing it this way is faster but requires a certain precission in your actions. Let's do this:
- Click the Audio tab in the Project Explorer view
- Now click the sound, hold the mouse button click and drag it over the Action list in the Event Property Editor view
When you release the sound, a Play action should be created with the dragged sound as the action's Target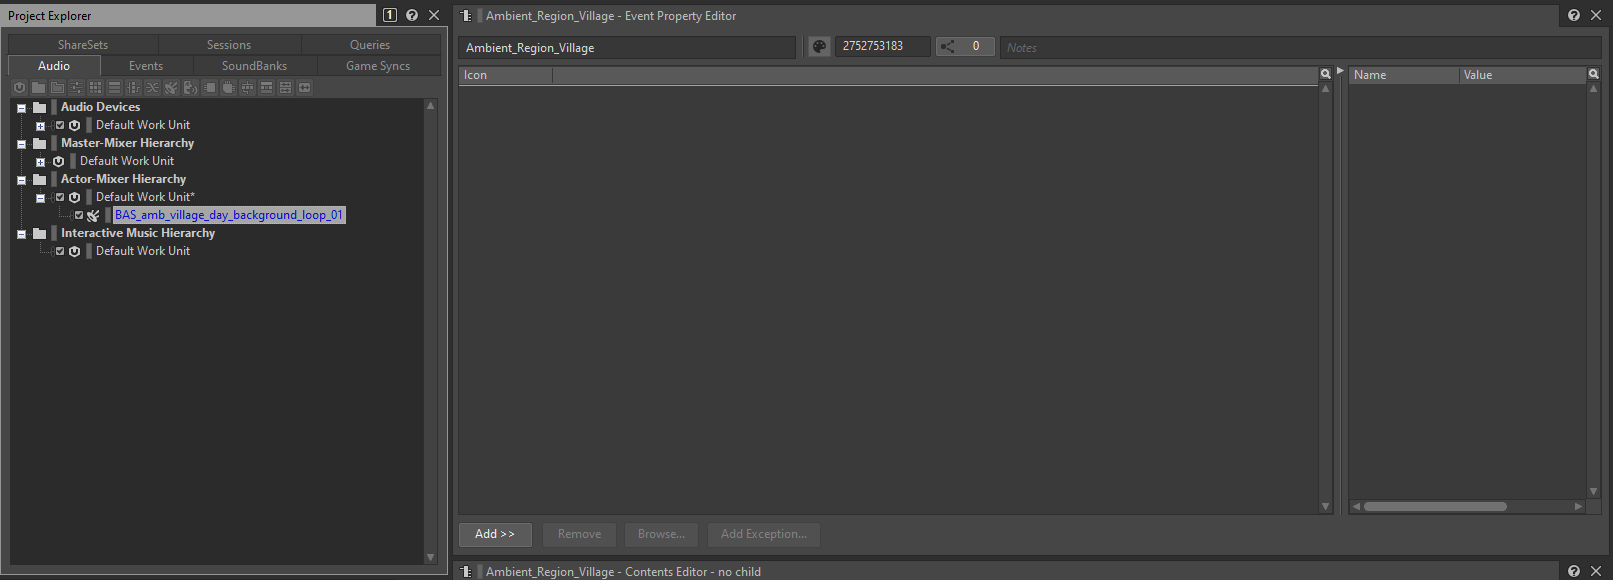 You should be able now to play the event it by selecting it and using the Play and Stop buttons in the Transport Control view. As always, be sure to stop it before going on.
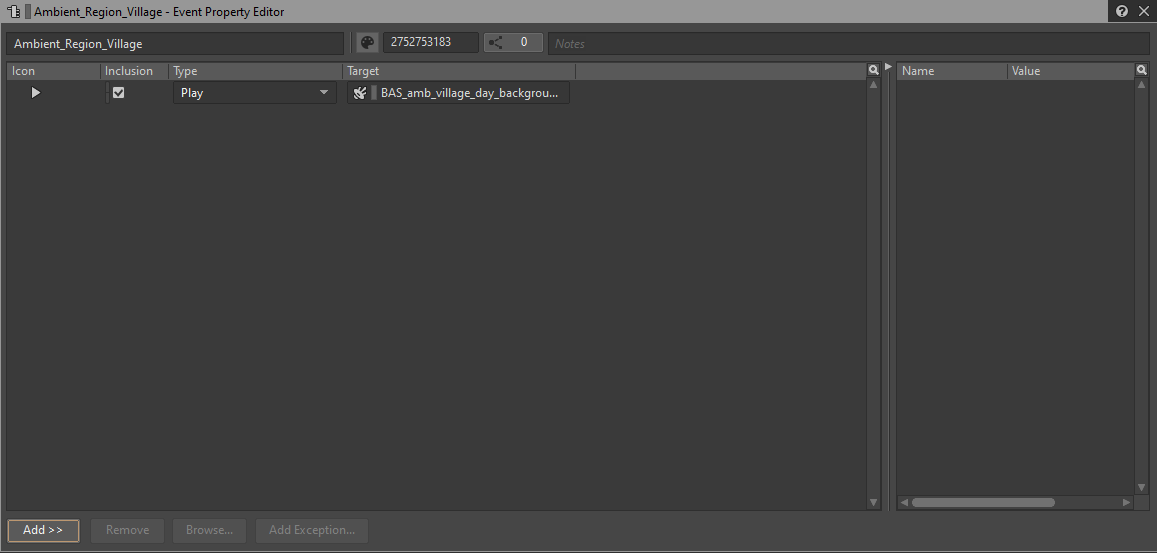
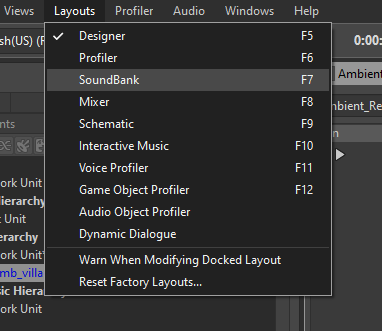
- Now that everything is working, we'll generate the soundbank so we can hear the sound in the game. This will also help us verify that everything is correctly set up. We'll always prefer to work with soundbanks in the SoundBank layout, so we'll open the Layouts option in the main menu and choose SoundBank.This way we'll swap the layout and we'll see the SoundBank layout which contains the SoundBank Manager and the SoundBank Editor views.
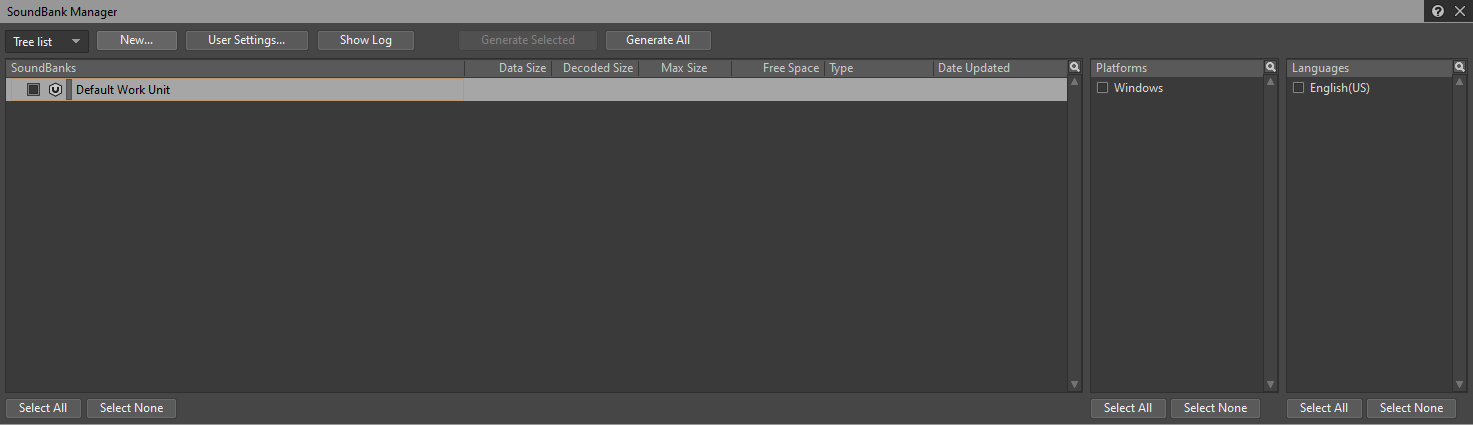
- In the SoundBank Manager, select the Default Work Unit and now click the New... button to create a new SoundBank.
- The name of the SoundBank we must create is documented in the Design Stub document. We can see this event is expected to be into the Village SoundBank.As we did with the Event name, we could copy it and paste it in the Name text box.
 Click the OK button and we'll get back into the SoundBank Manager. Unfold the Default Work Unit and you'll see the newly created SoundBank.
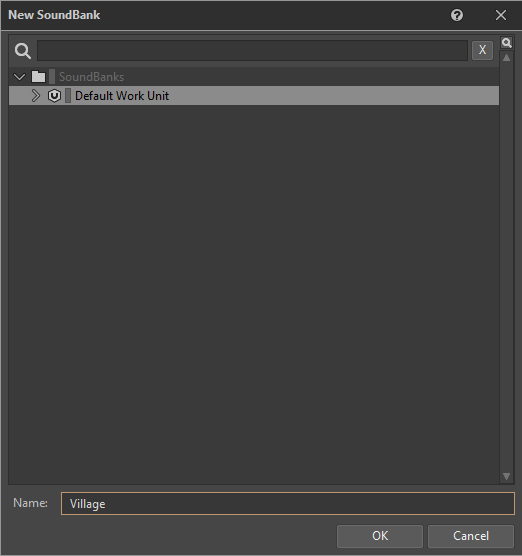
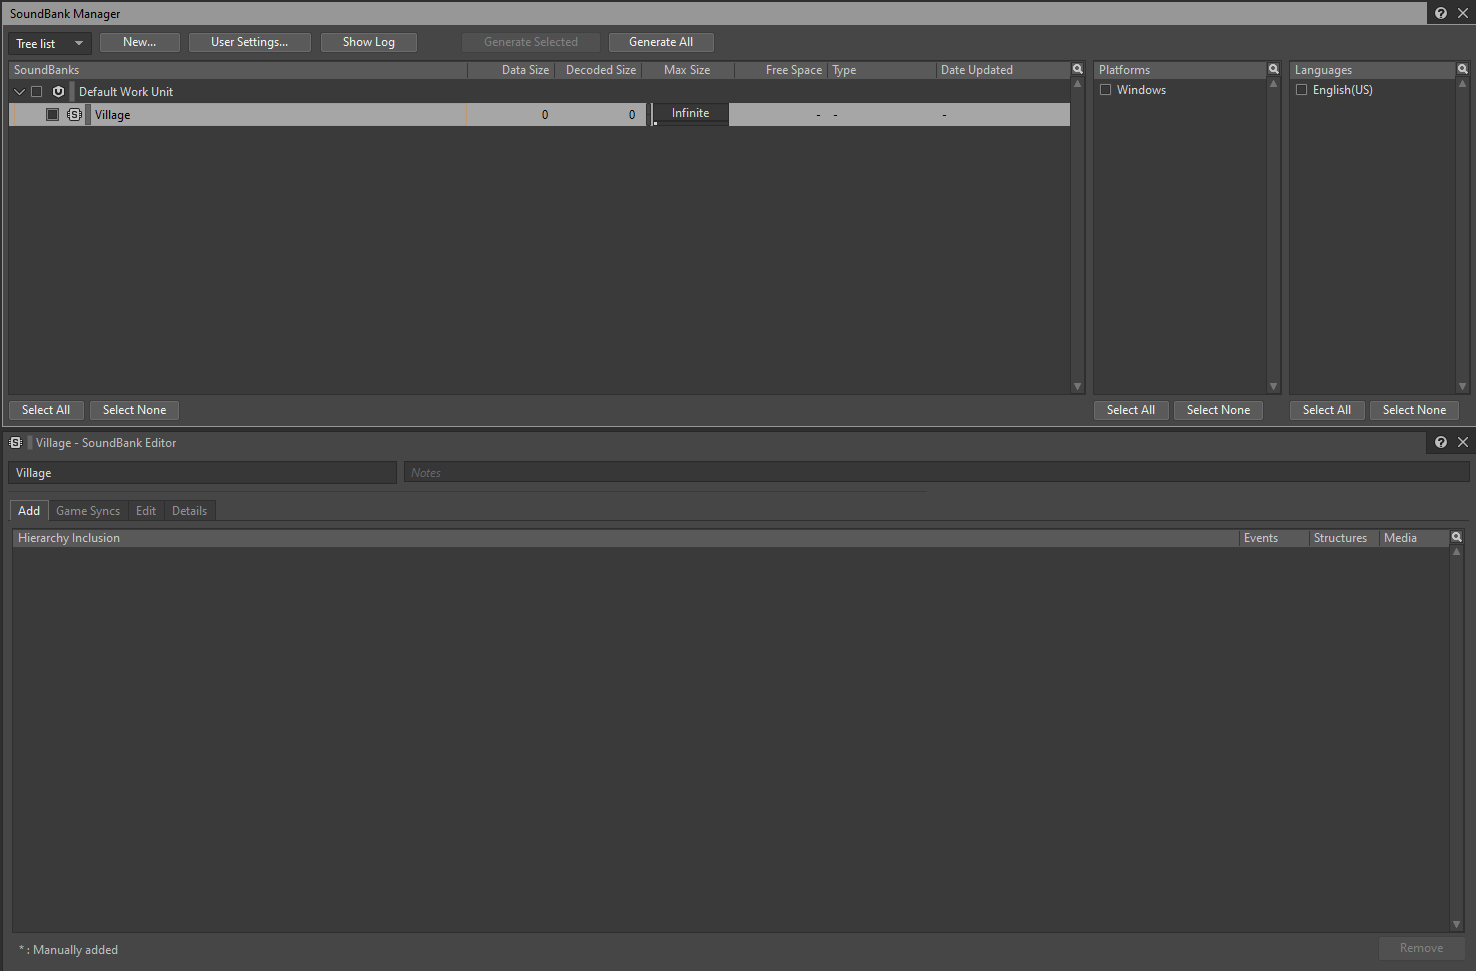
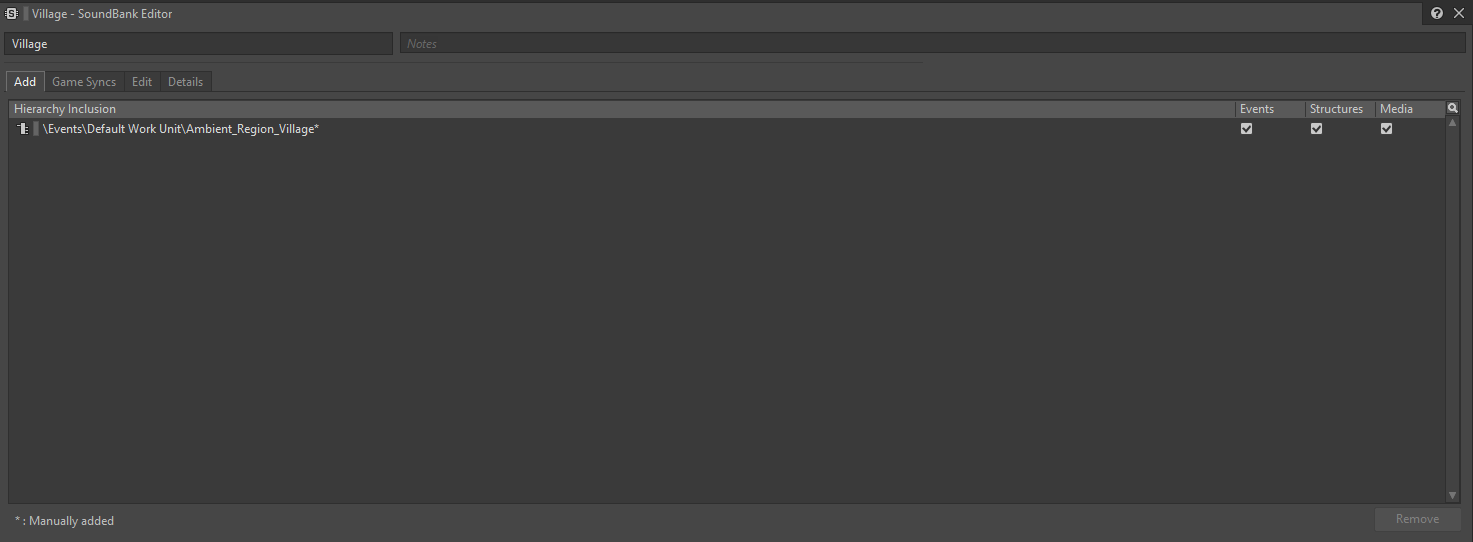
- At this moment the SoundBank is empty. We can see that in the SoundBank Editor's Hierarchy Inclusion list. We must now drag our event there in order to have it included. Notice you can either drag it from the Project Explorer's Events tab or from the Event Viewer list below the Project Explorer.Once you release it, you'll see it's now included in the SoundBank Editor's Hierarchy Inclusion.

- The last step before we can hear our sound in the game is generating the SoundBank and overwritting the original one. We'll also remove all the other SoundBanks in the game, so we're sure we're only listening our sounds. We'll choose the SoundBank generation path first. Click the User Settings... button in the SoundBank Manager view and we'll see the SoundBank Settings dialogue:
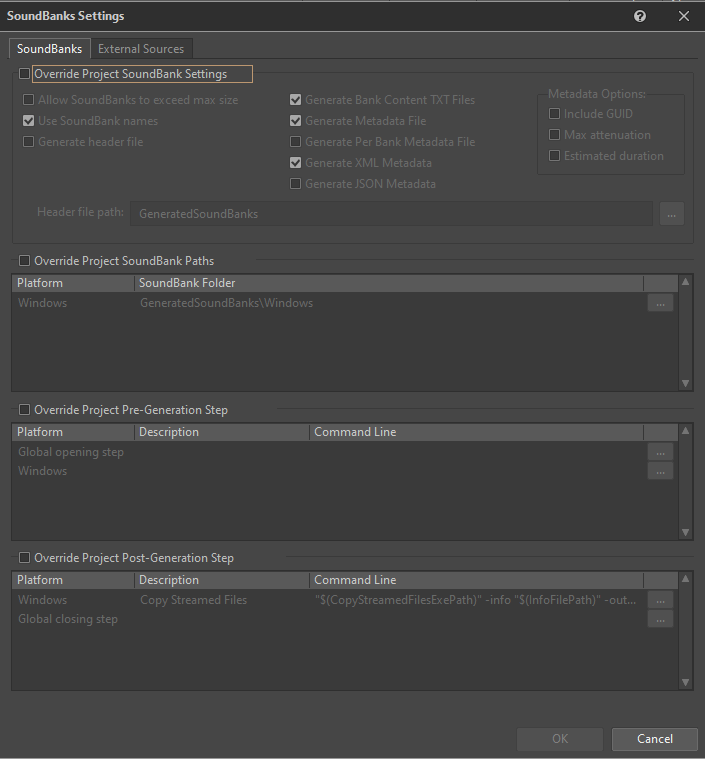
- We'll check the Override Project SoundBank Paths bow. We can now click the ... button and choose our output SoundBank Folder. We'll see the folder name in the SoundBank Folder column.
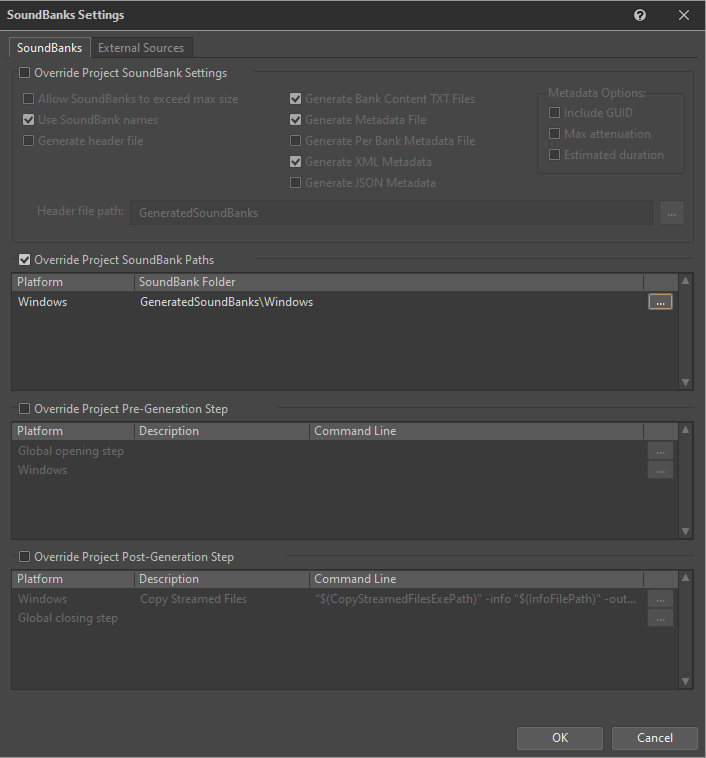
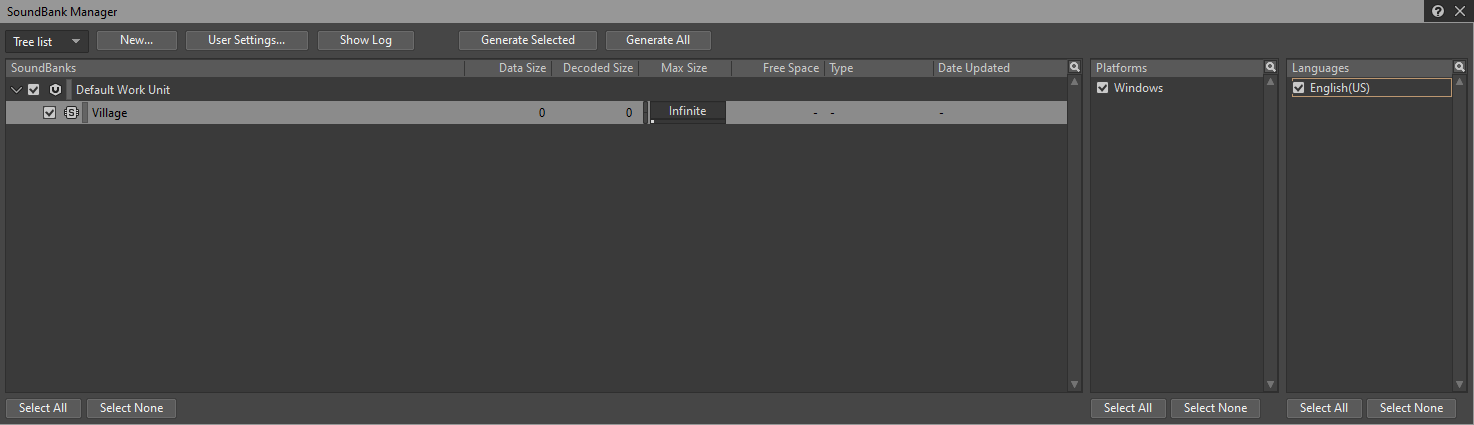
- We can now check the SoundBank, the Platform and the Language. This will enable the Generate Selected button. As this project is small we could also use the Generate All button to generate the SoundBanks.
- If you go to the folder chosen as output path, we'll found the generated SoundBank files.
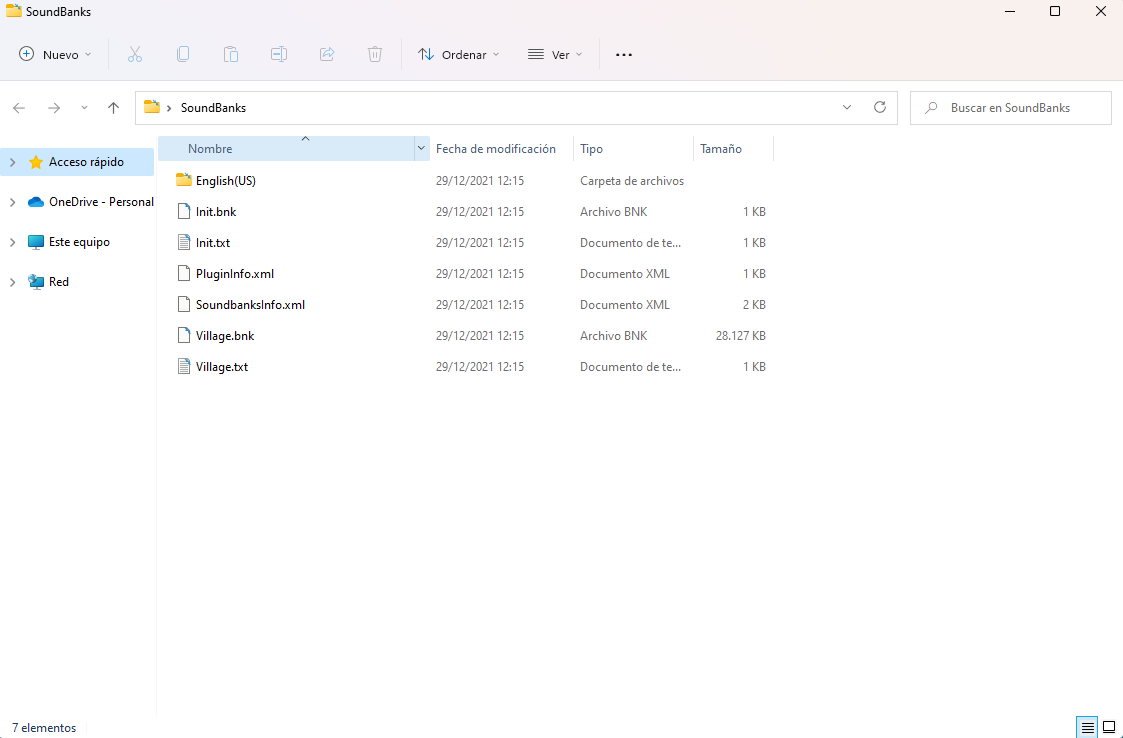
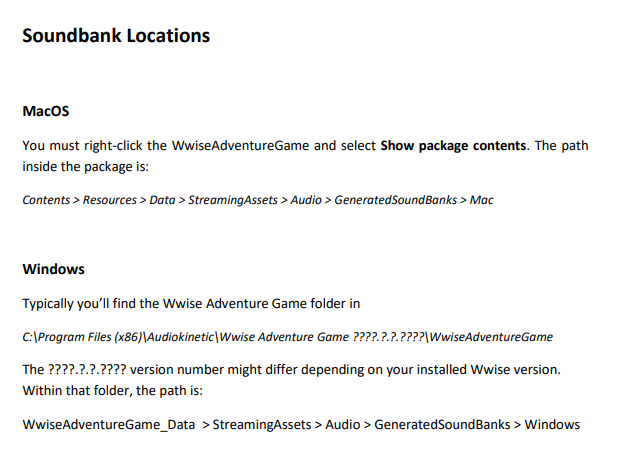
- Now the last step is removing the original SoundBank files from the game and copying/moving our SoundBanks into the game's SoundBank folder. That folder is specified in the Wwise Adventure Game Design document.
- Now you should be able to launch the game and click the Start game button. We should instantly hear our ambient track. If it doesn't work, the most common issues are these:
- The SoundBank name is wrong
- The SoundBank files aren't placed at the right folder
- The Event name is wrong
- The Event wasn't included in the SoundBank
- The Event Play action wasn't set up
- There's something wrong with the Sound SFX in the Actor-Mixer Hierarchy
Creating a new project
Importing a single audio file
Creating an event to play a single sound
Setting up the required soundbank
Generating the SoundBank and replacing Wwise Adventure Game sound with our own integration
This way we can integrate most sound effects in the game: ambiences, prop emitters, destruction, enemy and UI.
Setting up 3D positioning
Prop emitters, destruction and enemy sounds should have set up their positioning properties, so they're volume is properly attenuated and they're correctly panned in the output speakers so we hear the sound coming from the right direction. Let's do an example with the Ambient_WaterDrop event. I'm assuming you've got the sound integrated and you must just set the 3D properties up for that sound.
- We'll set this up using the Designer layout. In this example I'm assuming you're using a Random Container holding different waterdrop sounds. As this is a Sound SFX and not the event name, we don't care about the name, as long as it help us identify what's the sound we're talking about. Start by selecting the sound you want to set up:

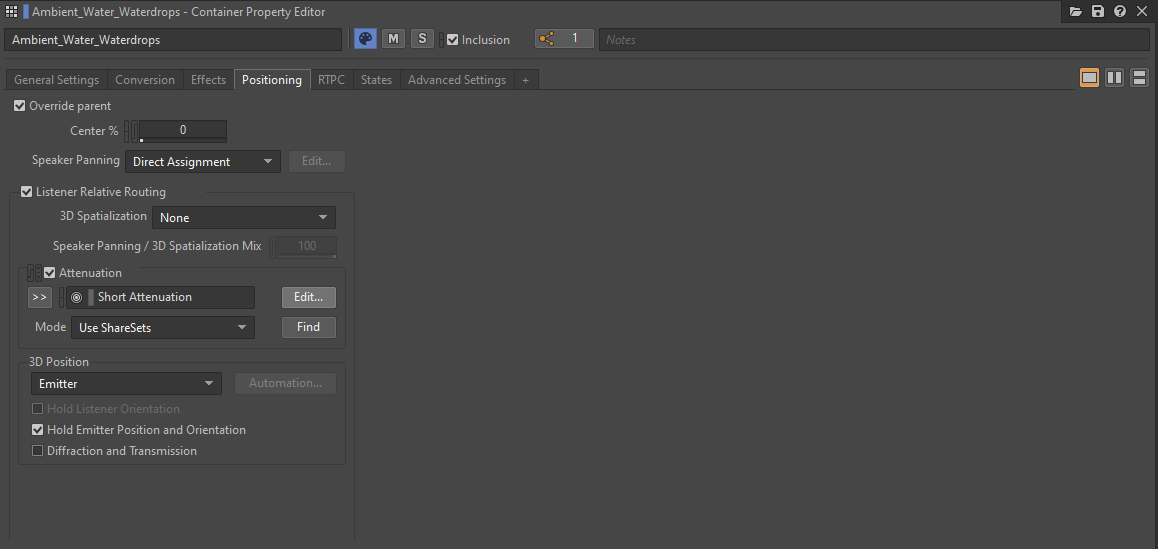
- In the Sound Property Editor we'll click the Positioning tab. You might need to check the Override parent box if it's enable, so we can set up the properties of this sound. Alternatively, we could set up the positioning in the parent of the sound if it holds sounds that need the same setup.
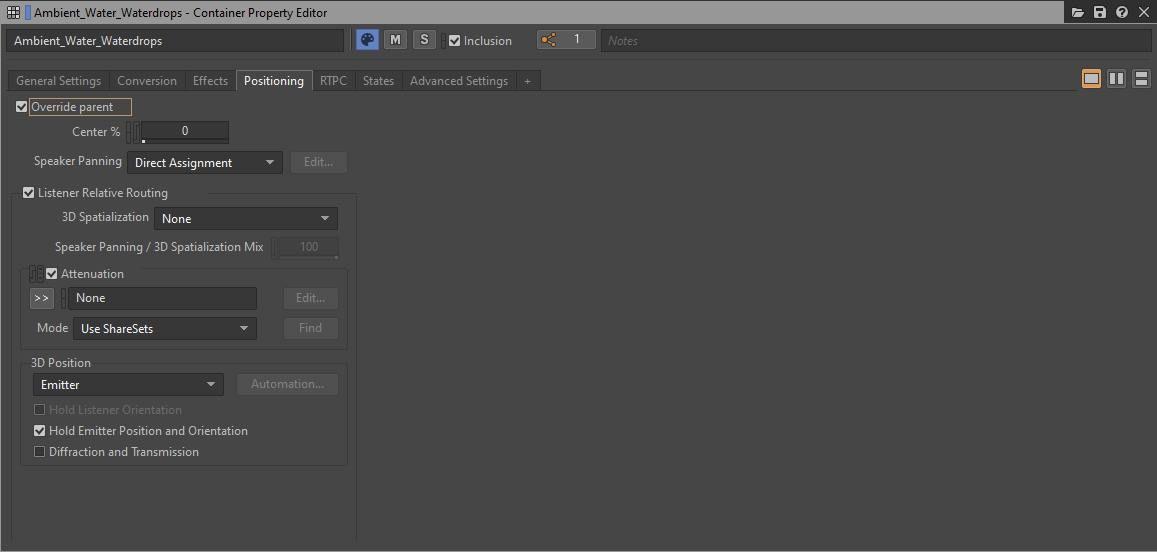
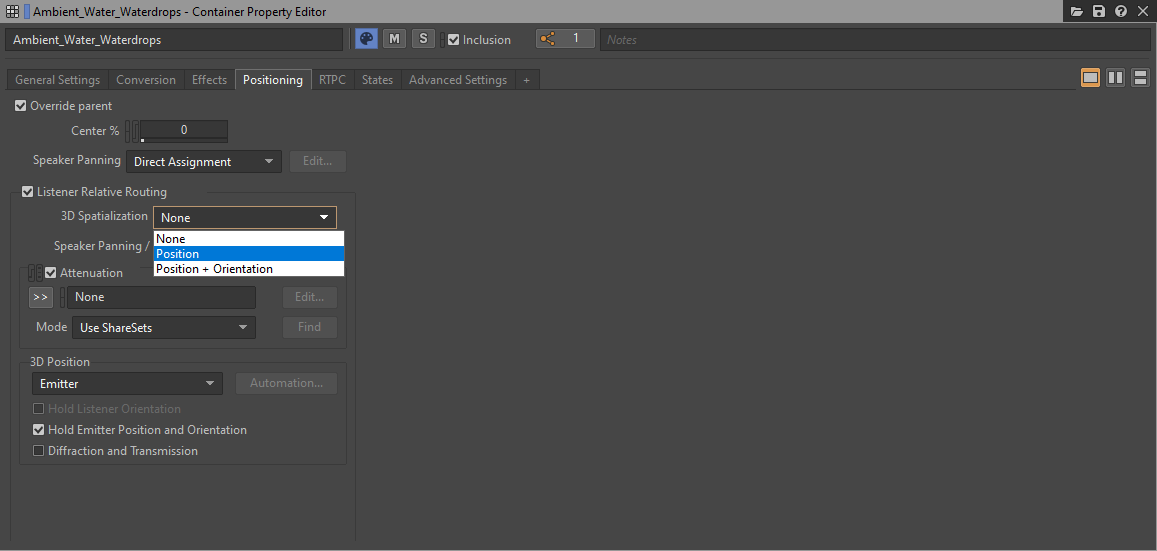
- In order to enable 3D processing, we need to change the 3D Spatialization mode. By default it's set to None, we should change it to Position (or Position + Orientation if you're going to take orientation into account to set up a cone attenuation)
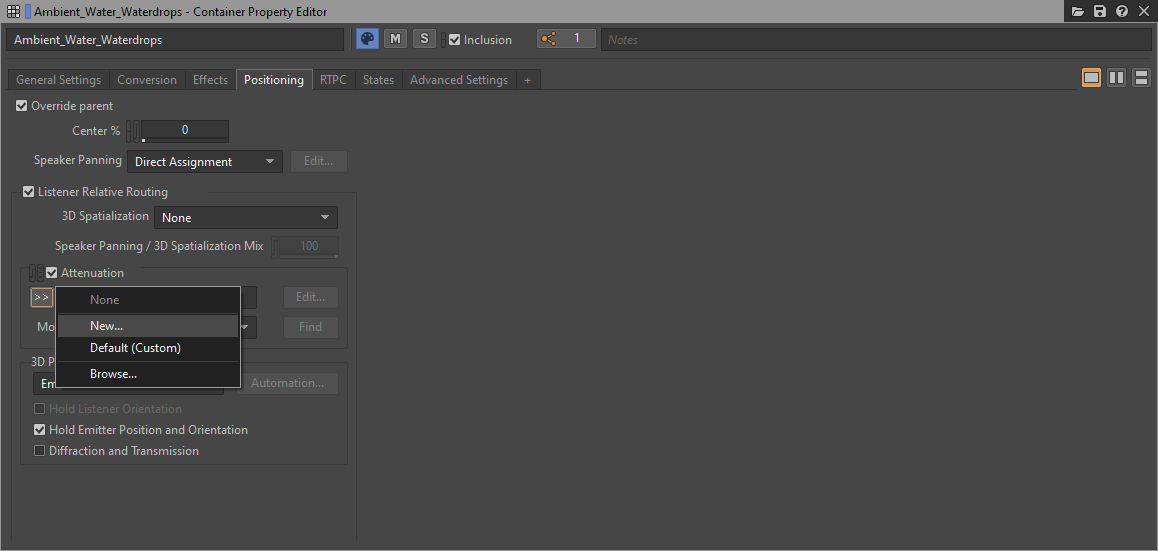
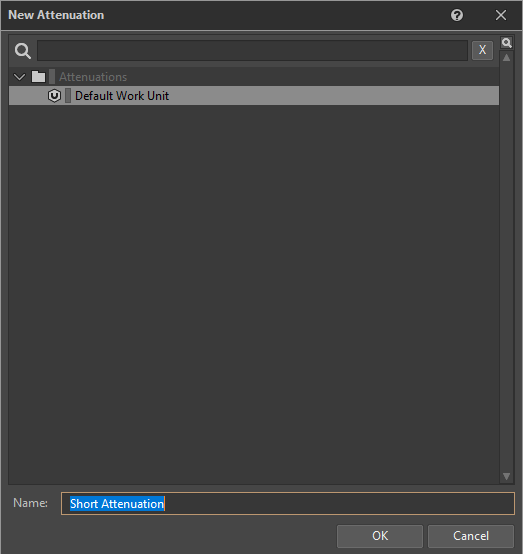
- Now we need to choose the Attenuation preset. If we had created an attenuation preset before we could just pick it up from the options unfold by the >> button in the Attenuation group. If we need to create a new one, we can click the New... option to create a new preset. This will open the New Attenuation dialogue where we can give a name to the attenuation preset. Names will usually refer to the distance range covered by the emitter and can include additional details we might need to identify the preset configuration.
- After choosing the preset, if we need to modify it, we can click the Edit... button. This will edit the preset, so all sounds using this preset will be affected. We could also change the setting for this single sound using the Define custom mode instead of the Use ShareSets mode which is selected by default.
- After choosing the preset, if we need to modify it, we can click the Edit... button. This will edit the preset, so all sounds using this preset will be affected. We could also change the setting for this single sound using the Define custom mode instead of the Use ShareSets mode which is selected by default. After clicking the Edit... button, the Attenuation Editor view will open.
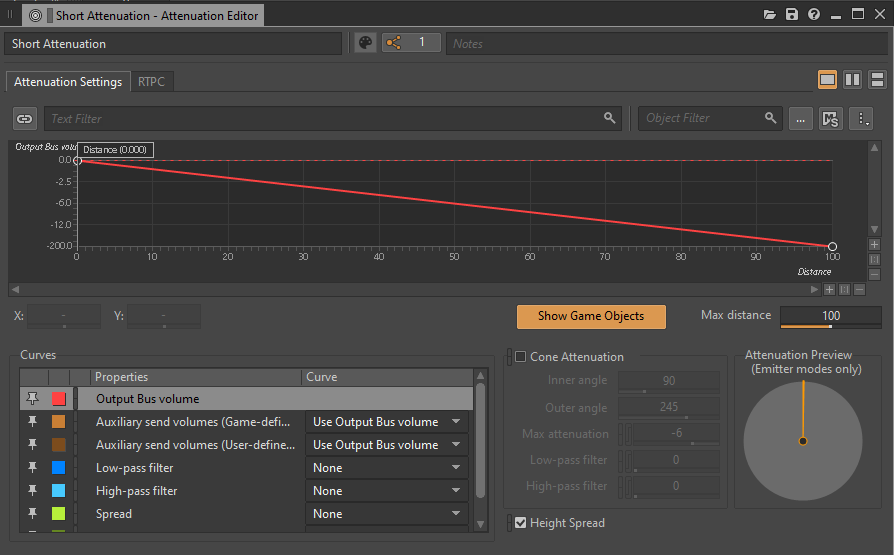
- The most important parameter here is the Max distance value. Notice you can write any value, the slider might be confusing, as you can enter a value as big as you want. Then you'll probably want to edit the curve, changing it from linear to logarithmic or adding nodes double-clicking the line. A nice addition can be setting up Low-pass and/or High-pass filter curves. Once done, you can generate the SoundBanks and test it in the game. This is the only way we can really check if the setup is right for the emitter.
Integrating Game Parameters (RTPC)
There are some Game Parameters updated by the game. We can connect them as we did in Lesson 3 of the 101 certification course. In that lesson we connected the RTPC to the hearbeat sound of the main character, something we can also do in Wwise Adventure Game. We can, however, connect them to the music, ambient sounds, etc... In this example, we'll connect the Time_of_Day parameter to the sound of the day & night versions of our ambient loops.
- We'll set this up using the Designer layout as usual. In this example I'm assuming you've got two background ambient versions, day and night. Start by importing the sample files into your Actor-Mixer Hierarchy as we did in the first example:
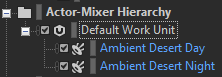
- Check the Loop checkboxes for both, so they play looped:
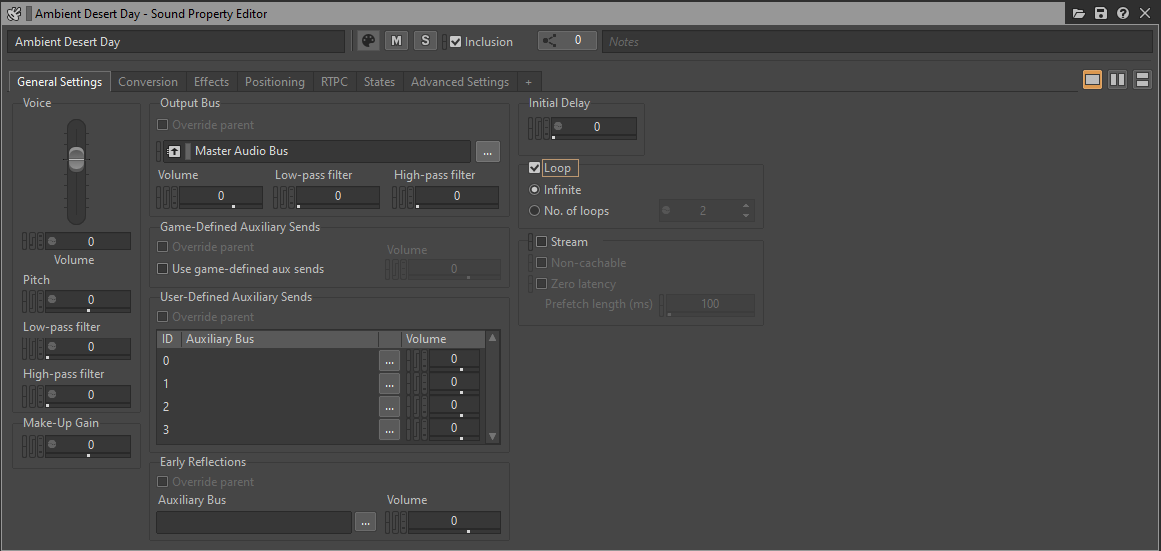
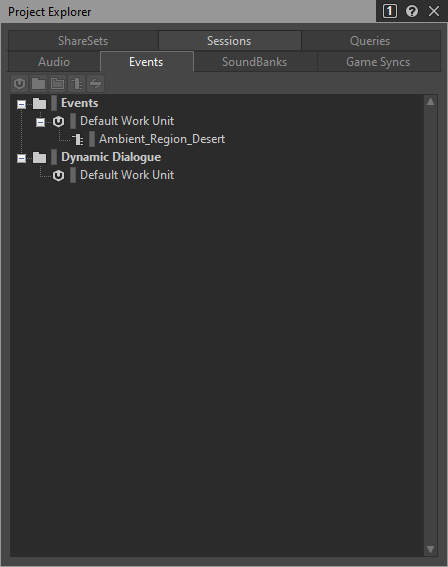
- Now let's create the event to play the files. Click the Events tab in the Project Explorer and create the event. I'm integrating the Desert background files, according to the Audio Design Document, the event name is Ambient_Region_Desert:
- Now switch to the Audio tab in the Project Explorer and drag each file to the event's Action List so we'll create a Play action for both:
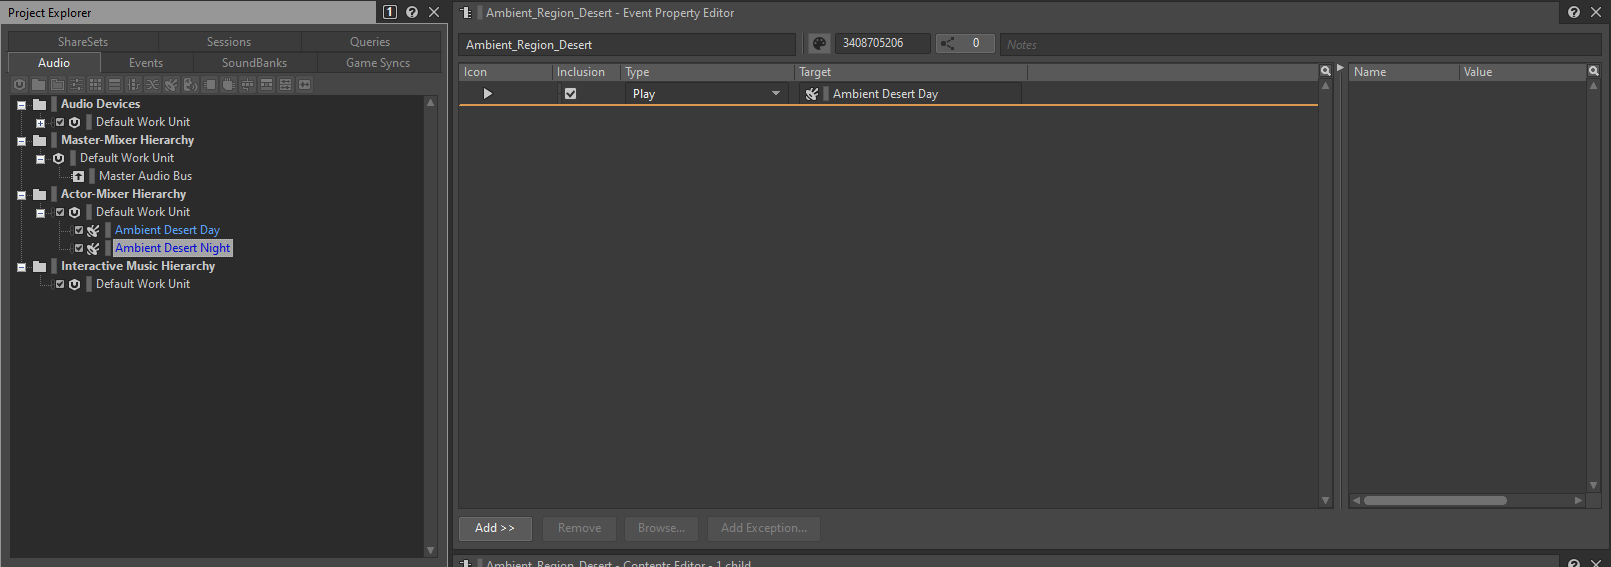
- We can play both files at the same time now (a better way to do this would be using a Blend Container but I'm trying to keep this simple!) Let's define the Time_of_Day Game Parameter in the Game Syncs tab of the Project Explorer:
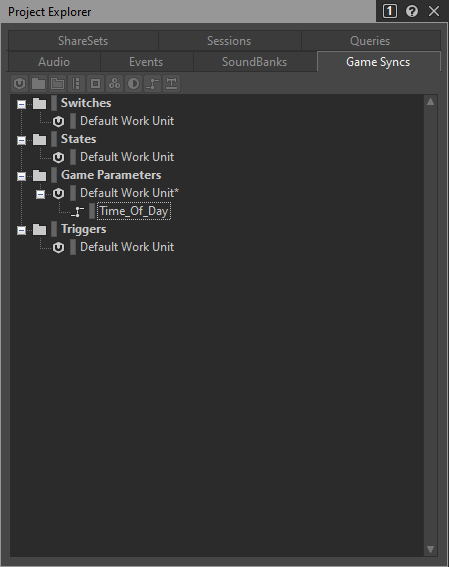
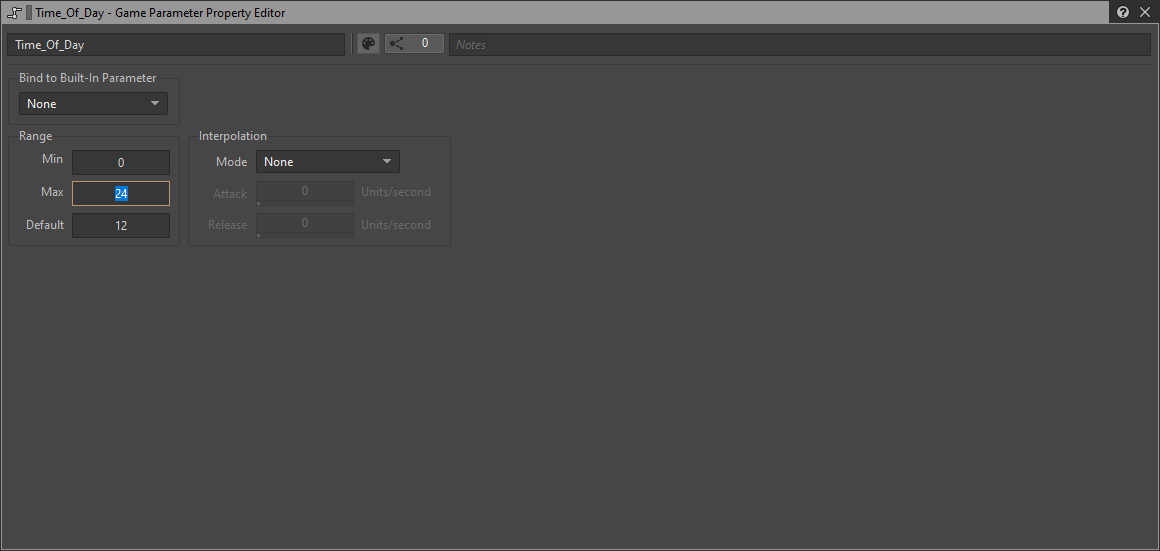
- Now click on your Time_of_Day Game Parameter and enter their range and default value in the Game Parameter Property Editor:
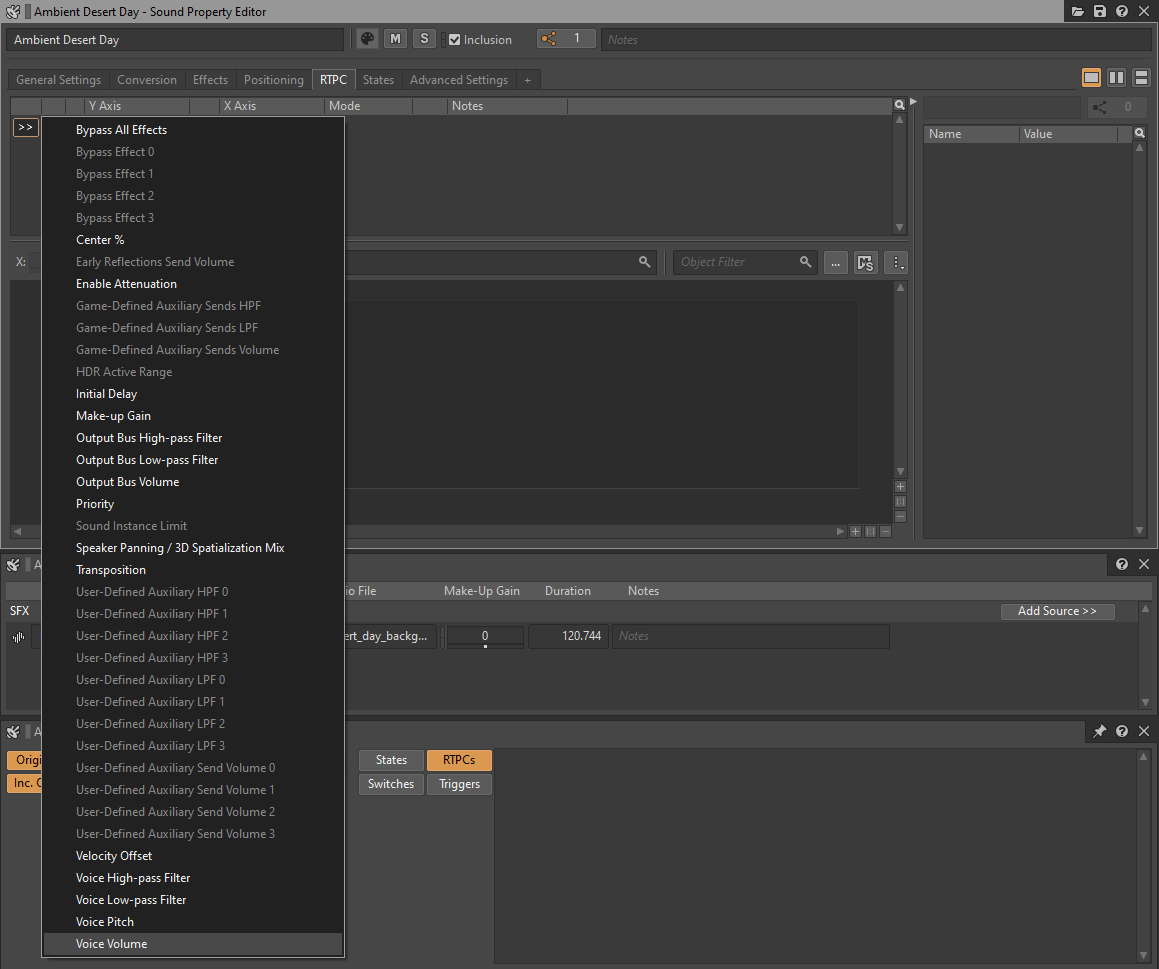
- Ok, we're ready to connect the ambient SFX volume to the Time_of_Day Game Parameter. Click the Audio tab of the Project Explorer and choose any of the tracks. I'll start with the day version. Then, in the Sound Property Editor go to the RTPC tab which will allow us to connect both. Click the >> button and choose the Voice Volume parameter.
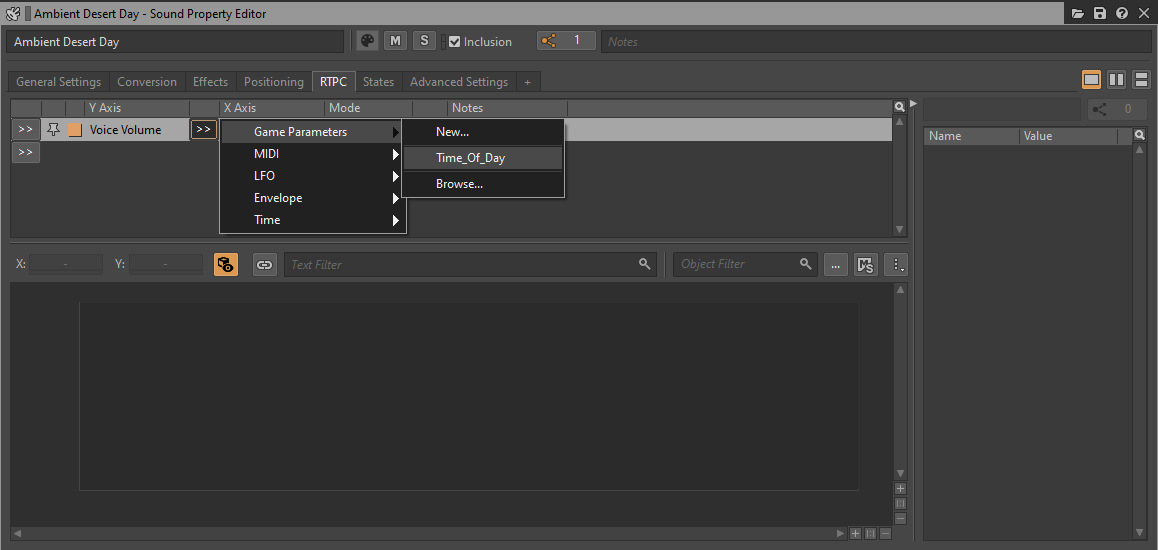
- Now click the new >> button on the right of Voice Volume and choose Time_of_Day:
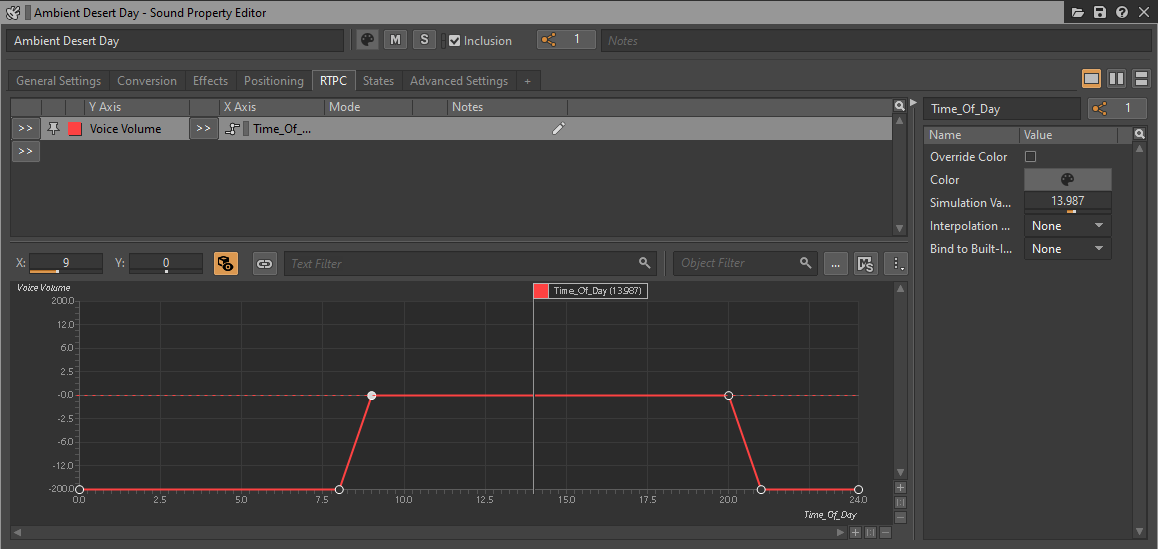
- You can now add the appropriate nodes double clicking and dragging them over the graph line. Adjust it so the sound starts fading in from 8 to 9 and make it fade out from 20 to 21 for example (you can use any other values you feel more suitable):
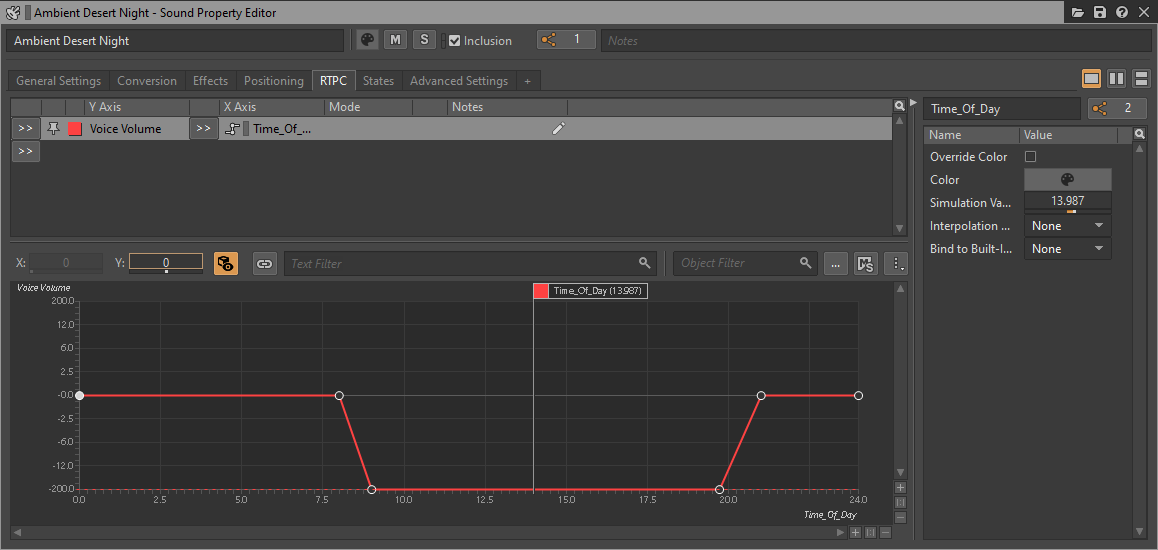
- Now select the night SFX at the Project Explorer and repeat the previous 3 steps but do the opposite, make it fade out from 8 to 9 and fade in from 20 to 21 (you can also choose other values if you feel they're more suitable too):
- That's it! You should now be able to Play the event and change the Time_of_Day Game Parameter to hear the ambient at different times of the day.
Integrating impact SFX (nested Switches)
In this game we've got a different set of weapons impacting on different surfaces. This is similar to the footstep example provided in the Wwise lessons, but we must take 2 switches into account, as we'll want to use a different sound depending on the weapon and depending on the impact surface. This is not difficult at all, we can just nest Switch Containers, so the first one will choose which the second one depending on the first.
So we can choose either the Surface_Type or the Player_Weapon_Type for the top level and then the other in the next level. Both options are ok!.
Using Surface_Type first
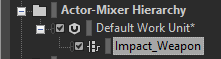
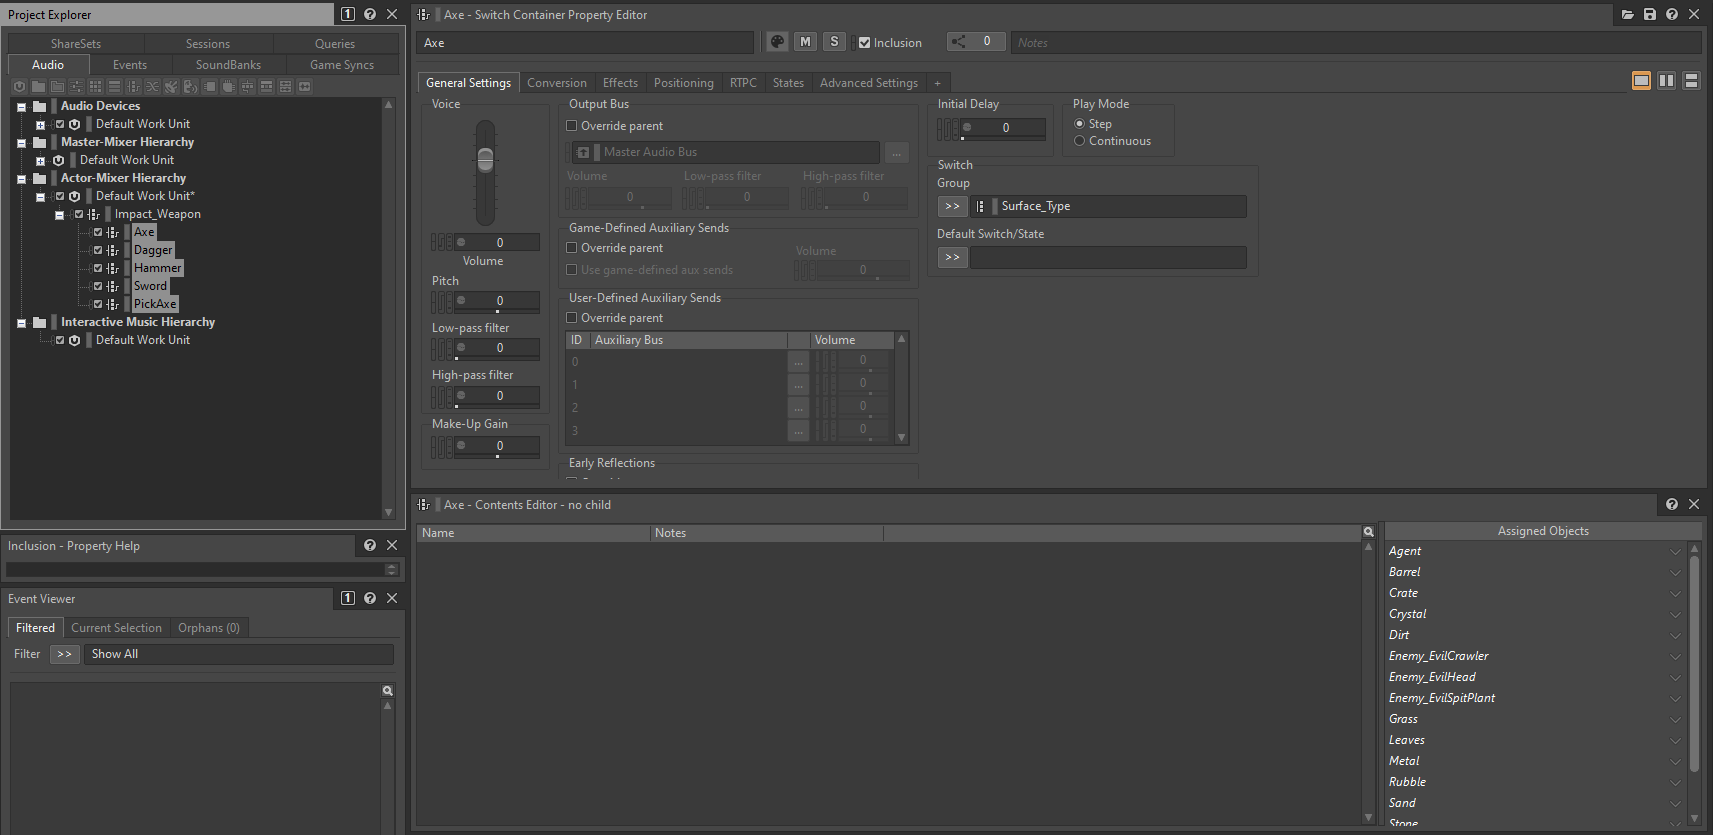
- We'll set this up using the Designer layout as usual. We'll create a Switch Container that will choose which sound set to play according to the specified surface:
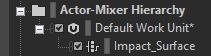
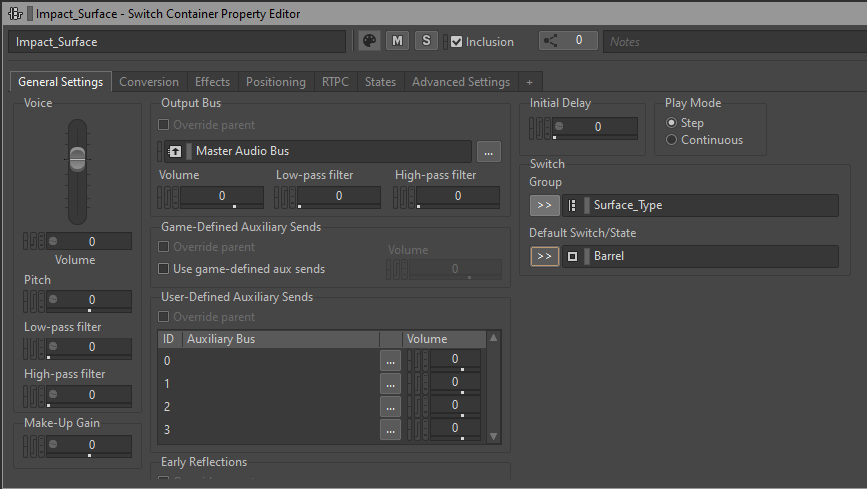
- We connect this Switch Container to the Surface_Type Switch Group and set a Default value:
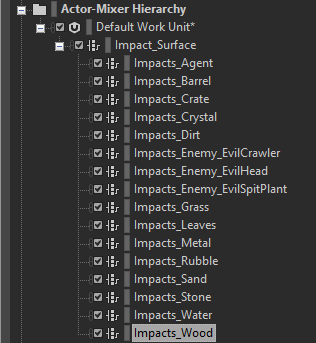
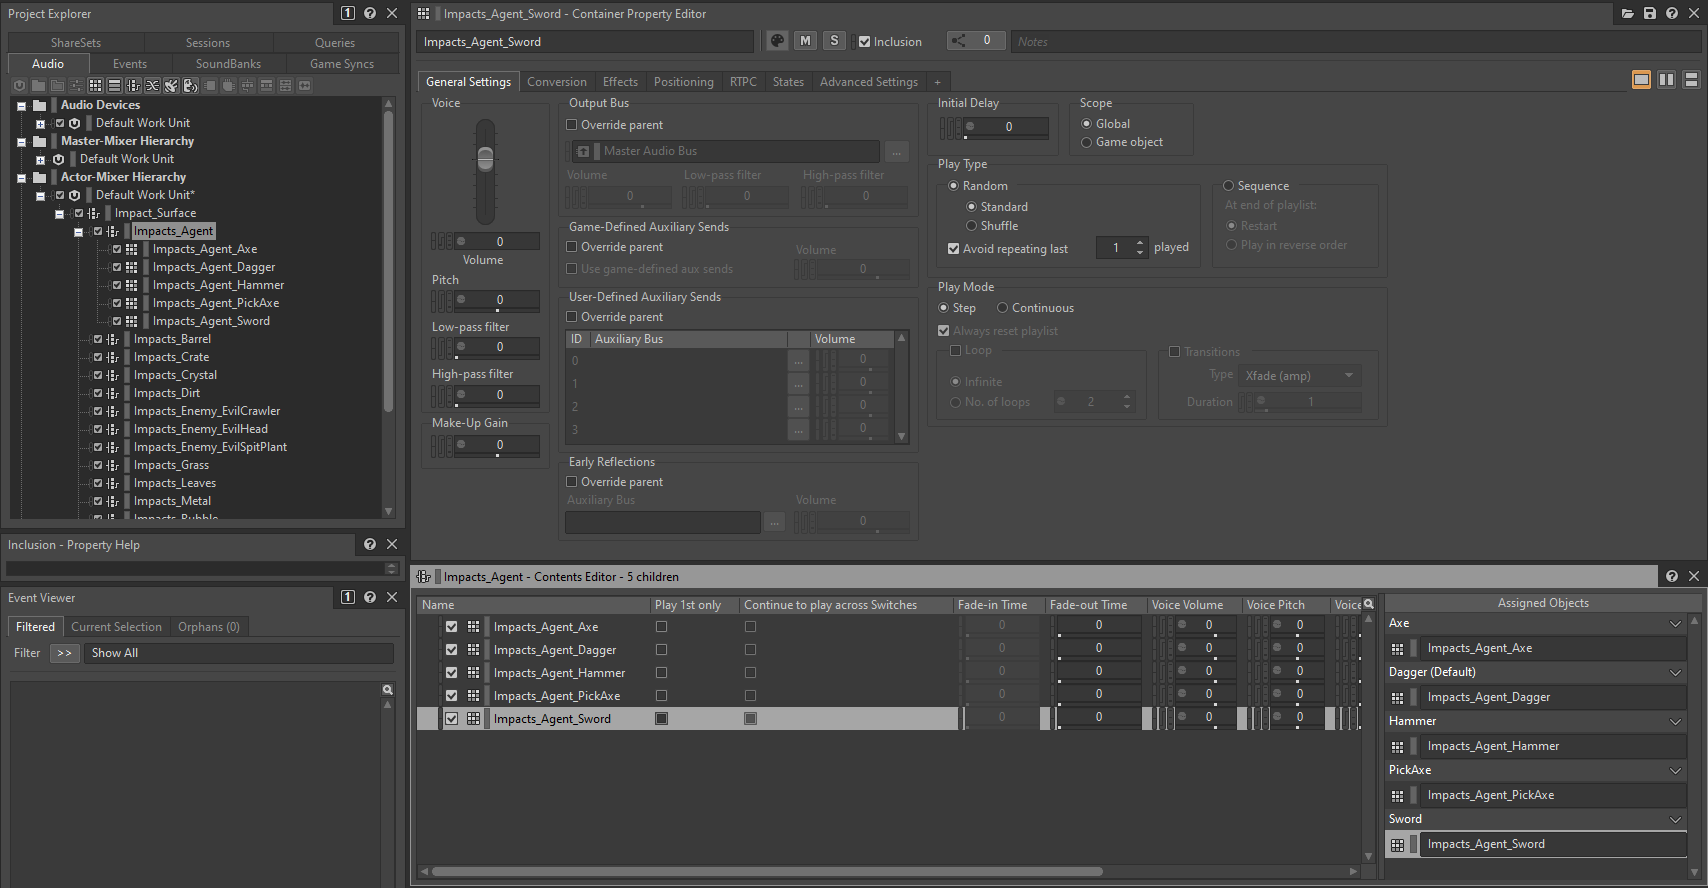
- Now we need a Switch Container for each surface. This container will be used to choose which sound to play for a given surface and a given weapon:
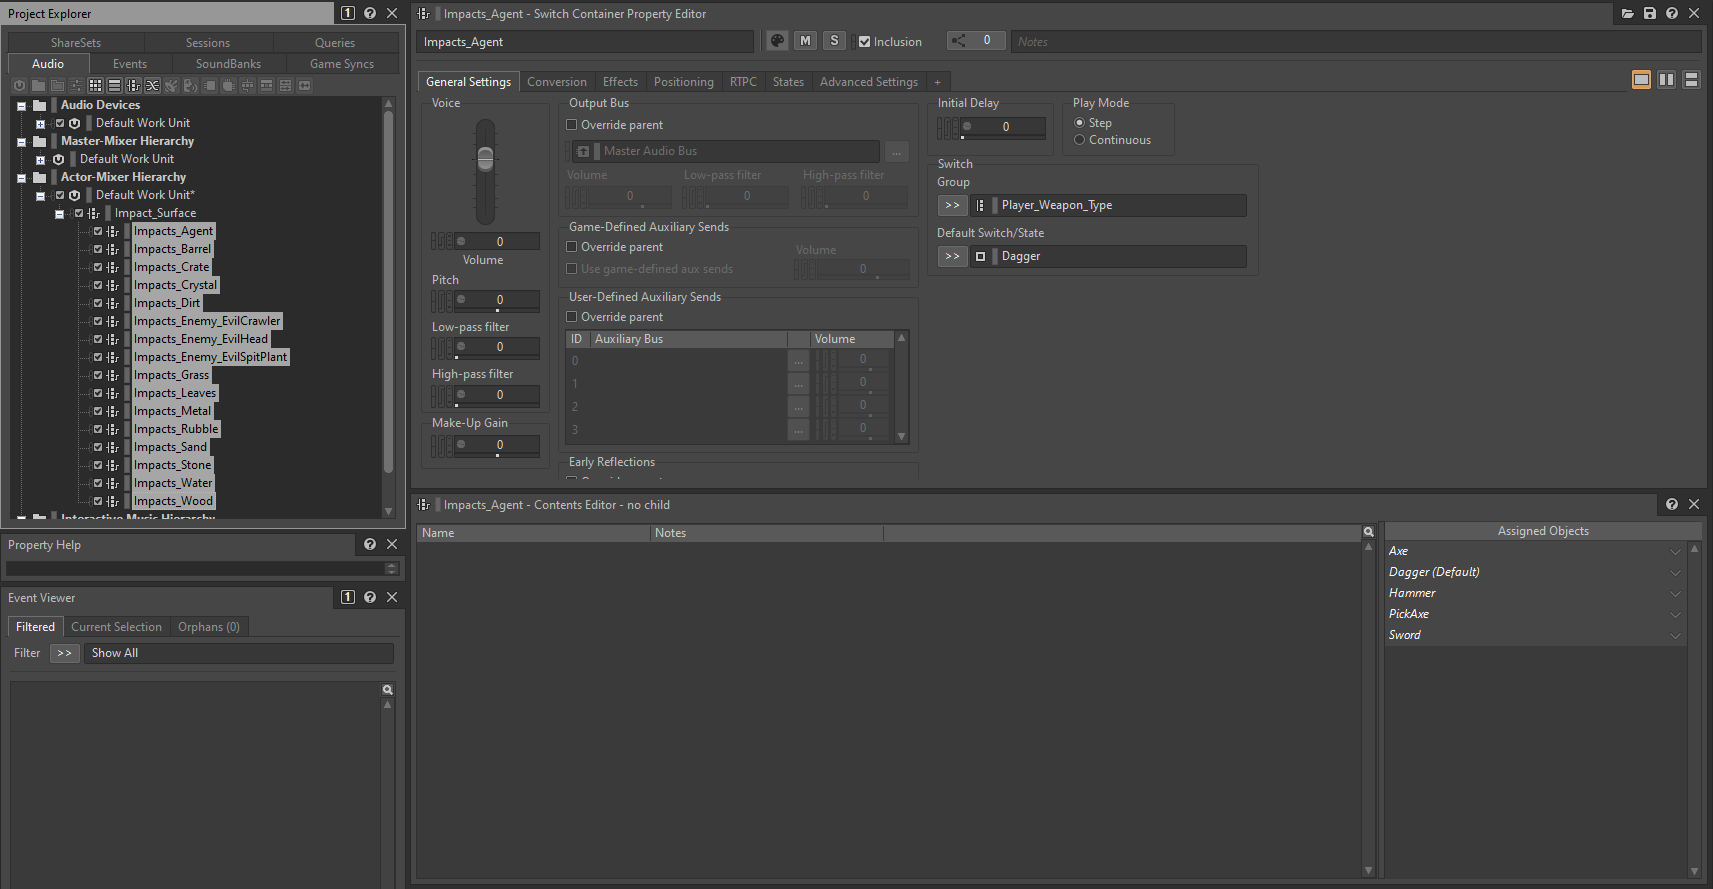
- Connect all these Switch Containers to the Player_Weapon_Type Switch Groups and set a Default value:
- Associate each surface's Switch Container into the top level's Switch Container:
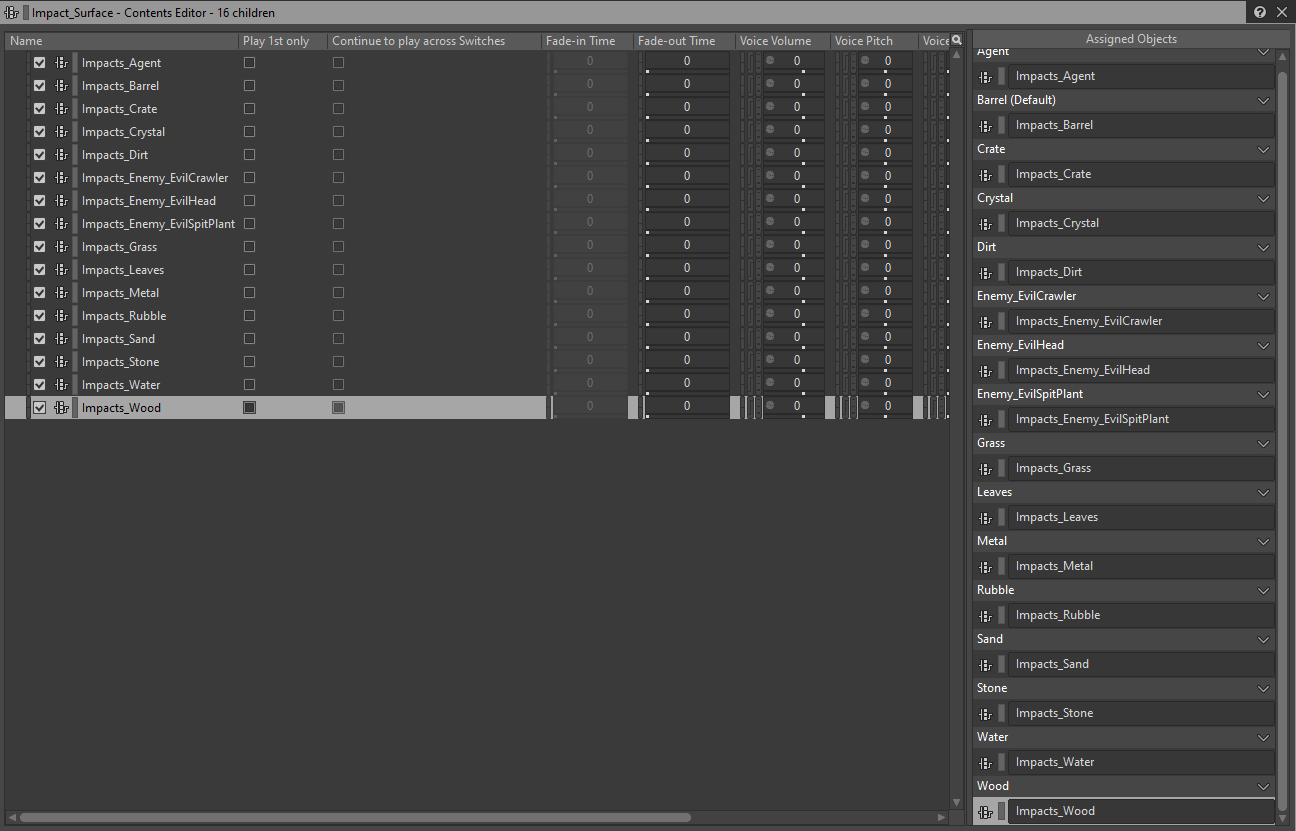
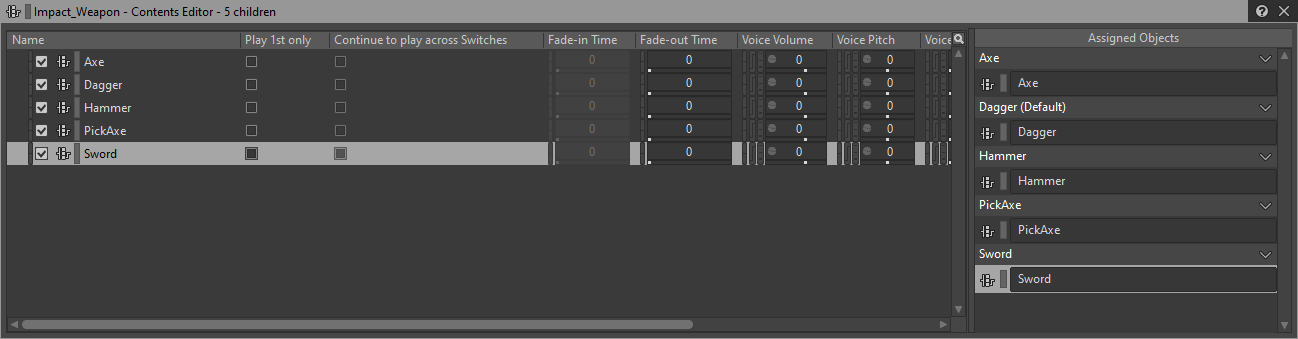
- Finally, we import or drag the corresponding SFX within the 2nd level Switch Containers and associate them in the Contents Editor:
Using Player_Weapon_Type first
- We'll set this up using the Designer layout as usual. We'll create a Switch Container that will choose which sound set to play according to the specified weapon:
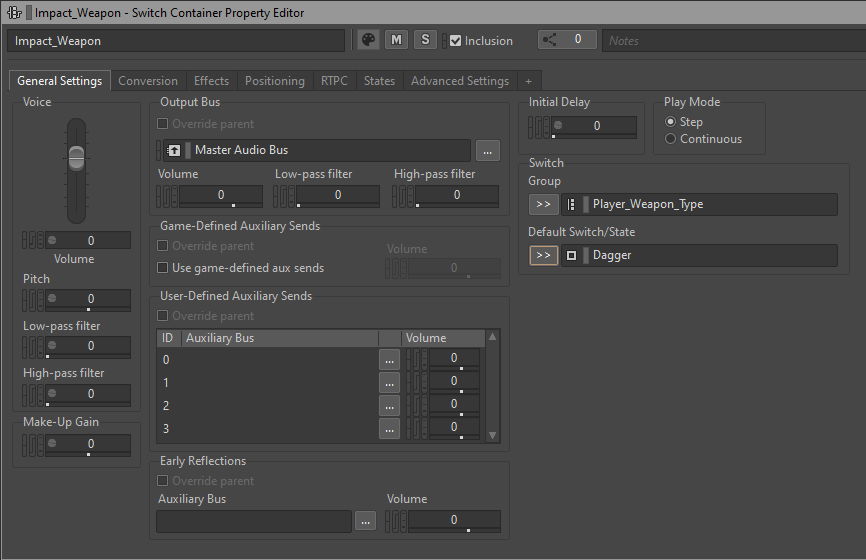
- We connect this Switch Container to the Player_Weapon_Type Switch Group and set a Default value:
- Now we need a Switch Container for each weapon. This container will be used to choose which sound to play for a given weapon and a given surface:

- Connect all these Switch Containers to the Surface_Type Switch Groups and set a Default value:
- Associate each weapon's Switch Container into the top level's Switch Container:
- Finally, we import or drag the corresponding SFX within the 2nd level Switch Containers and associate them in the Contents Editor:
Integrating a simple loop (Credits)
The simplest audio integration usually involves looping a single Music Segment. In order to loop a Music Segment we need at least to put it into a Music Playlist Container.
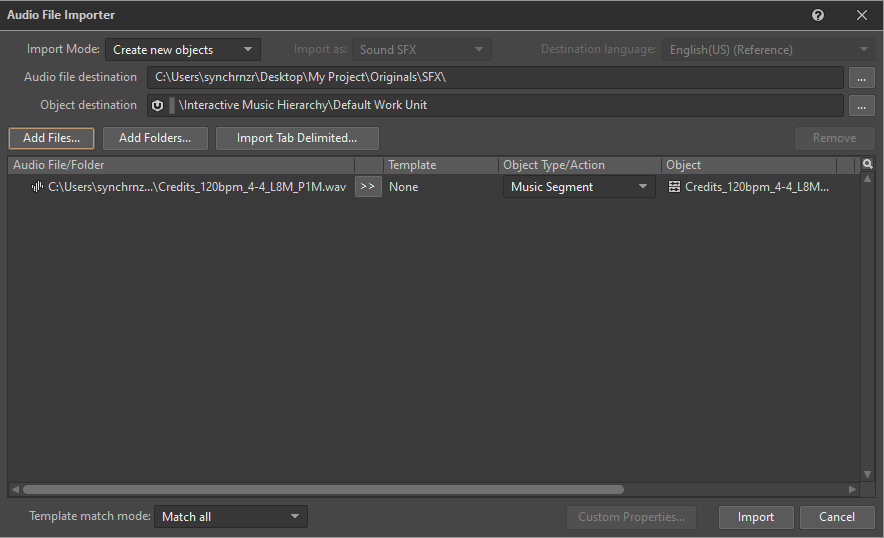
- Import the audio file as Music Segment into the Interactive Music Hierarchy:
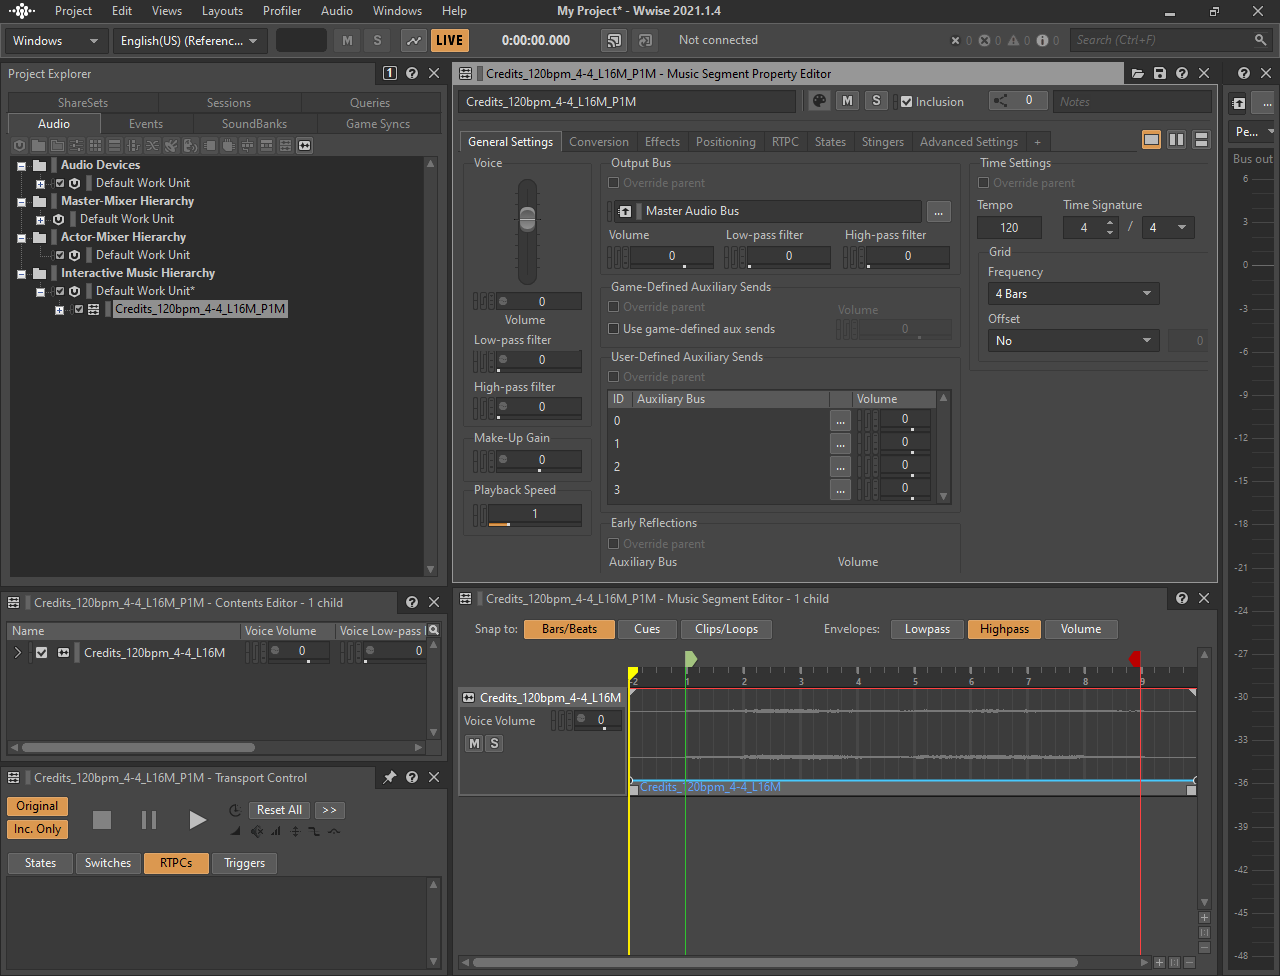
- Set the music tempo, time signature, pre-entry and post exit (we need to do this in the Interactive Music layout so we can see the Music Segment Editor):
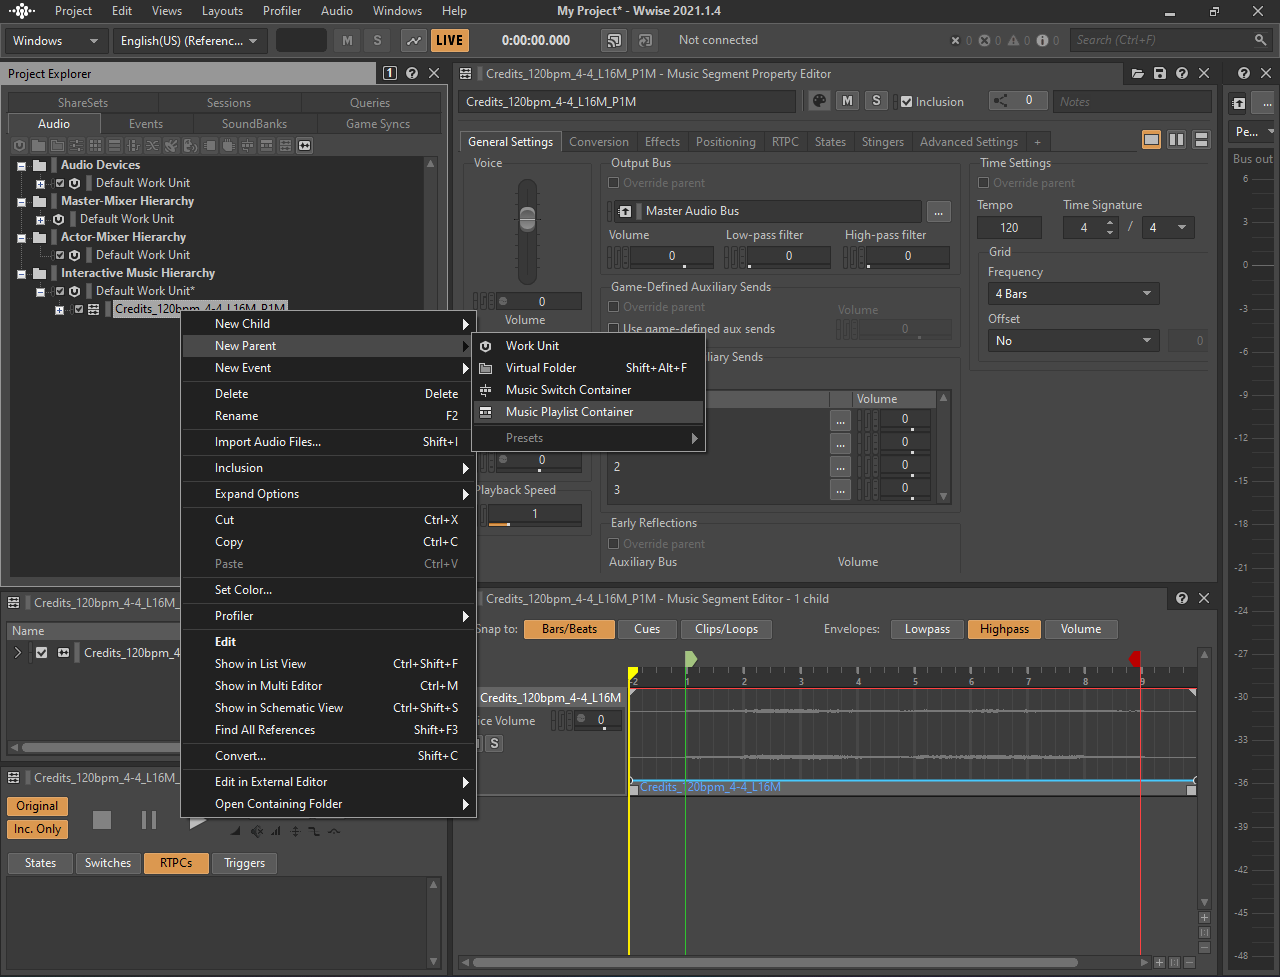
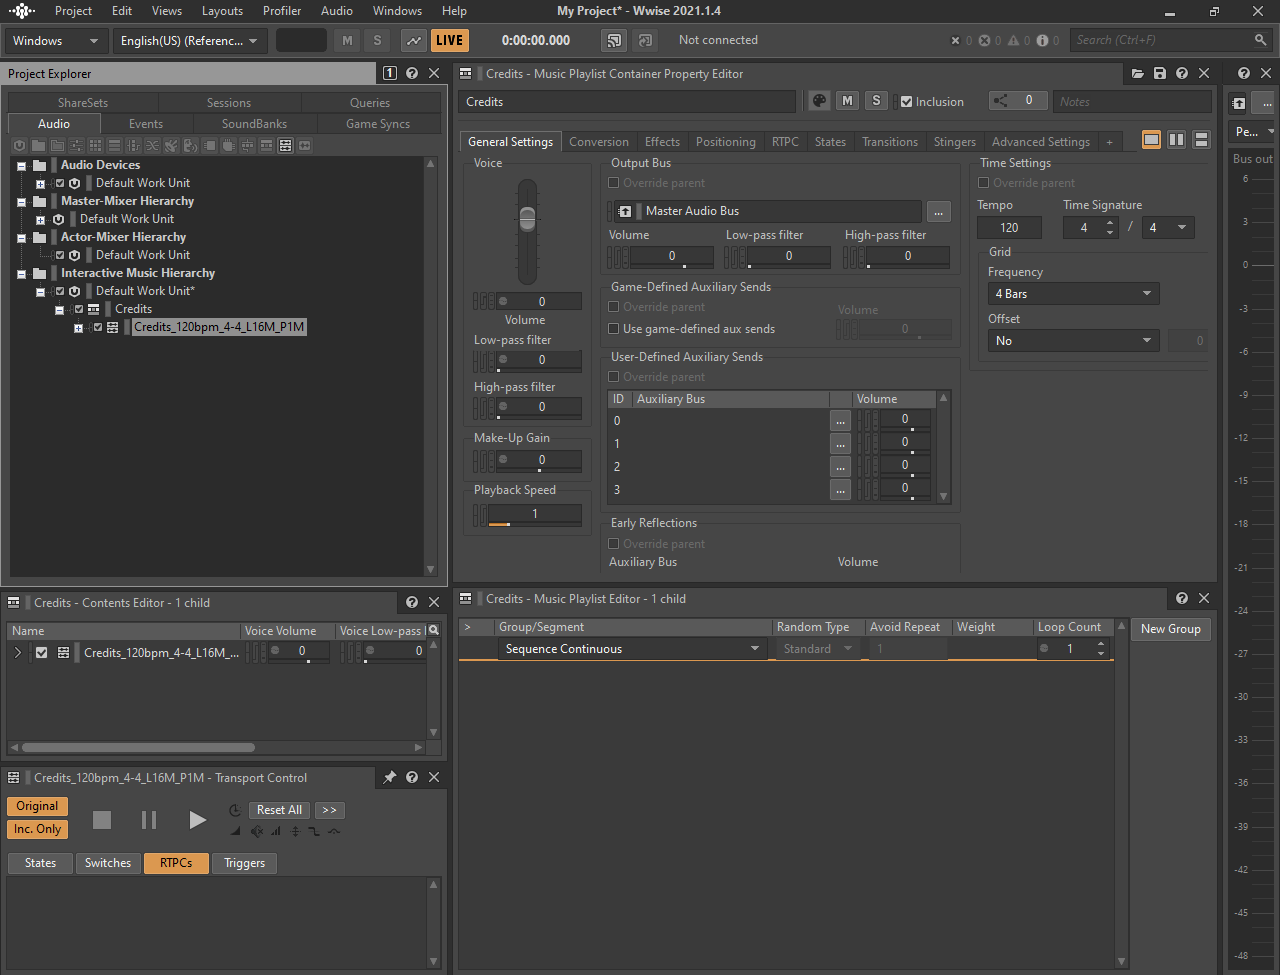
- Put the Music Segment in a Music Playlist Container. I'm using the New parent option here:
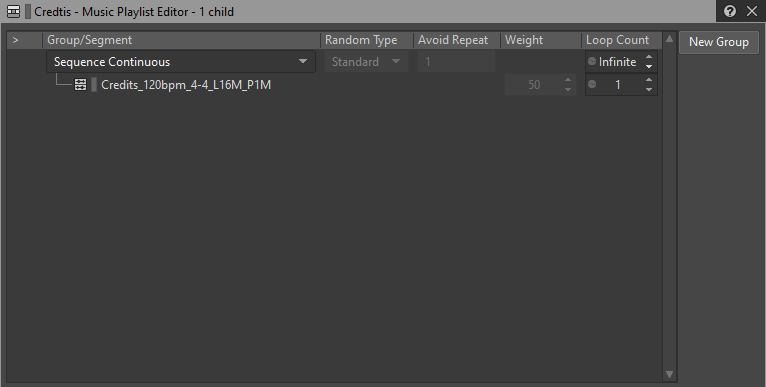
- Now drag the Music Segment into the Music Playlist Editor:
- Set to Infinite the Loop Count of either the Group or the Music Segment:
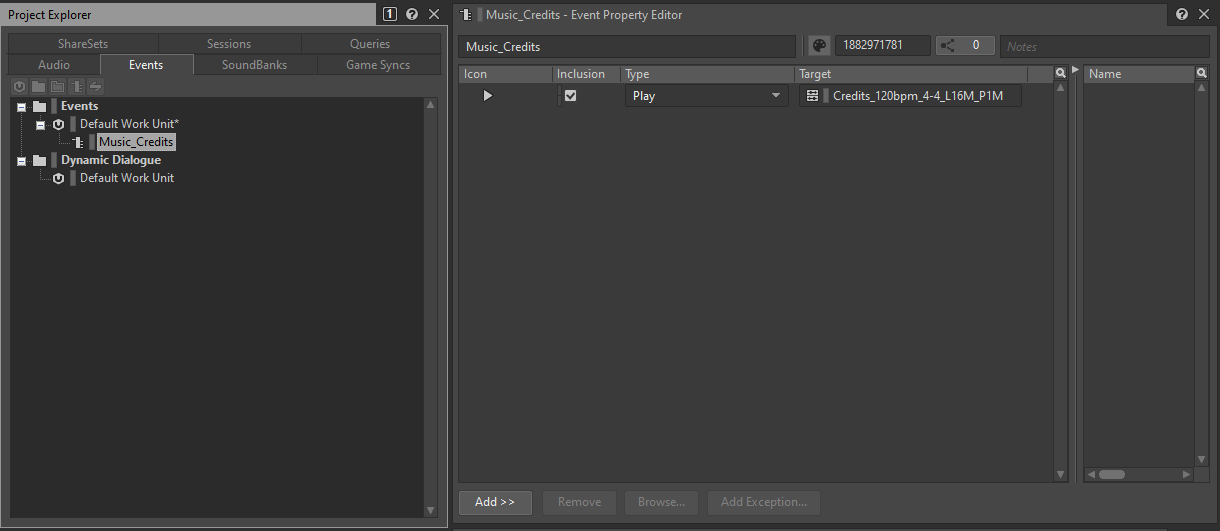
- That's it! Now you can bind it to your Music_Credits event in the Events tab of the Project Explorer, add it to the appropriate soundbank, generate the soundbank and try it into the game:
Integrating a loop with intro segment (Main Menu)
In this case we'll need to use 2 different Music Segments for both the intro and the main loop parts and create a simple playlist to play the intro once and then stick into the loop part.
- Import the audio file(s) as Music Segment(s) into the Interactive Music Hierarchy. If you've got just one file, you can duplicate it using Copy & Paste:
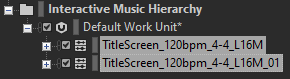
- Then use the squares at the bottom of the Audio Clip in the Music Segment Editor to split the intro from the main loop. In this example we've got a 4 bars intro part:
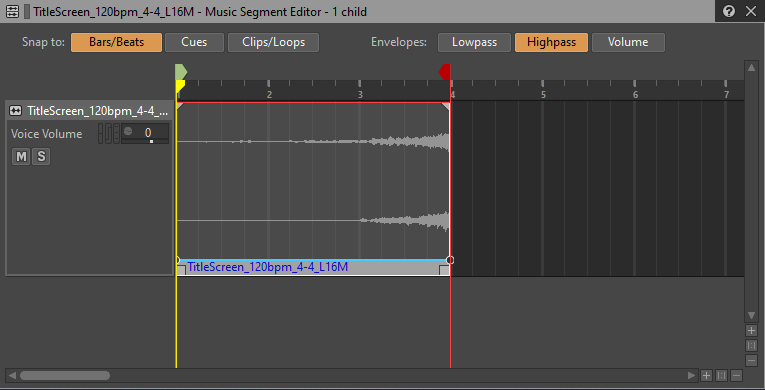
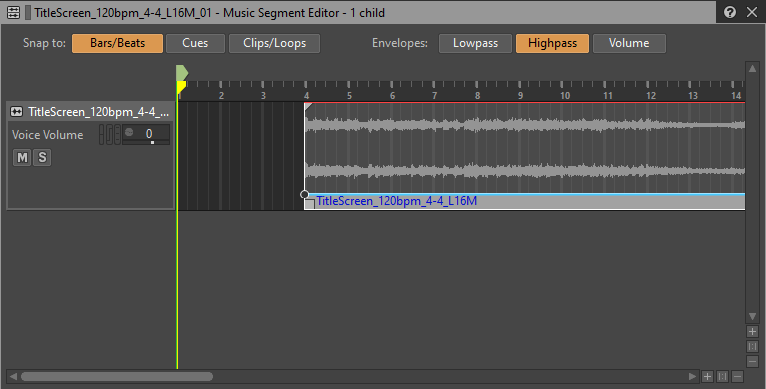
- Remove the empty space at the beginning of the main loop and adjust the exit cue (red arrow):

- Put them into a Music Playlist Container and set to Infinite the Loop Count of the main loop's Music Segment:
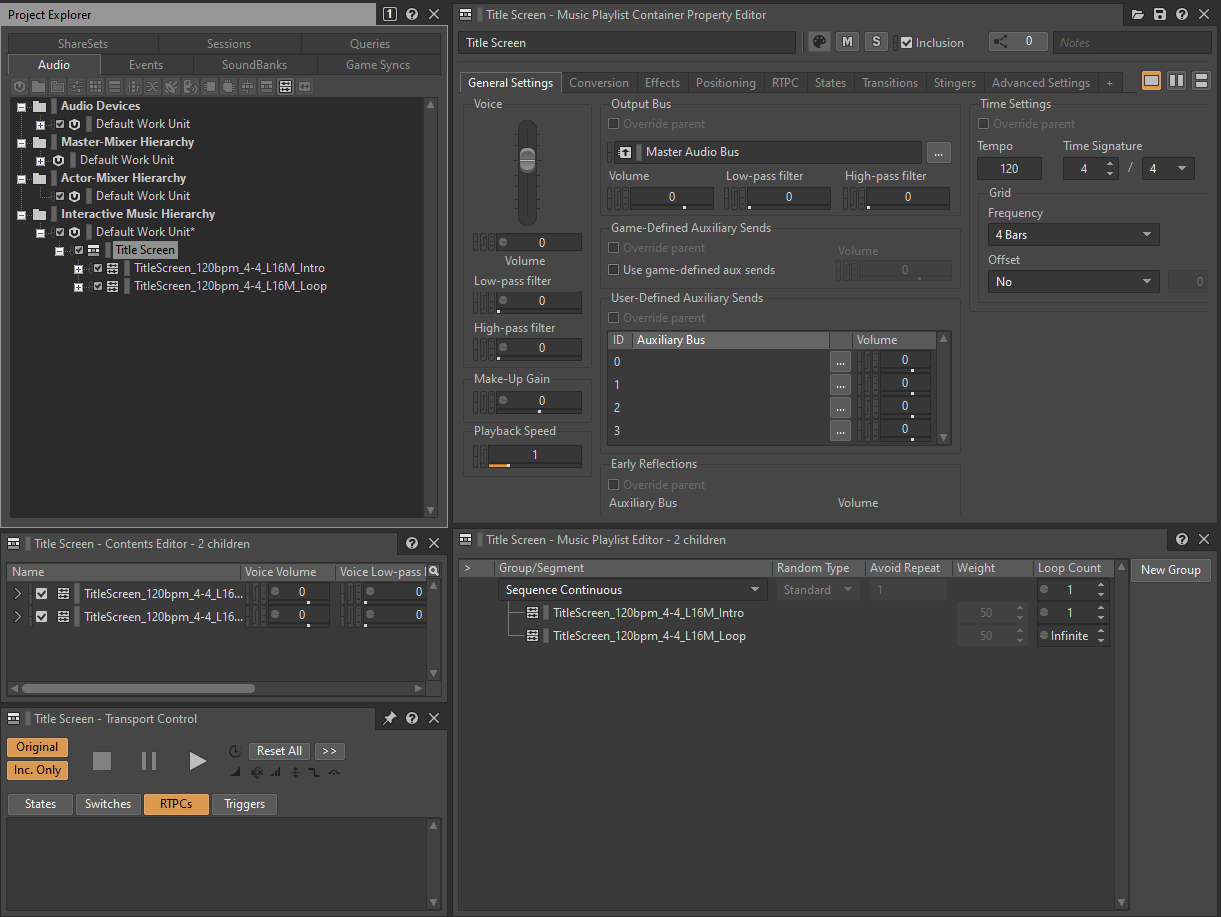
- That's it! Now you can bind it to your Music_TitleScreen event in the Events tab of the Project Explorer, add it to the appropriate soundbank, generate the soundbank and try it into the game as we did in the previous example.
Interactive music (Gameplay)
There are many different ways to approach the interactive music integration. I'll add different examples here, depending on the music segments you might have produced.
Example 1
This exampled is based in the following music scheme:
- A 4 layer system covering the Training Zone, Village, Woodlands and Pine Forest zones. Training Zone layer will always be there, Village layer will add up once we reach the Village, Woodlands and Pine Forest layers will be added on top of the previous ones. We'll name this case Loop A.
- A 5 layer system covering the Library, Dungeon, Forge and Core zones. A common layer will be played and additional layer is suposed to be mixed on top in any of those 4 zones. We'll name this case Loop B.
- Two single-layer loops covering the Desert and the Cave zones.
- 4 additional layers to be used while enemies are attacking us. A common layer for all of them, then another layer that can be introduced when that enemy is attacking us.
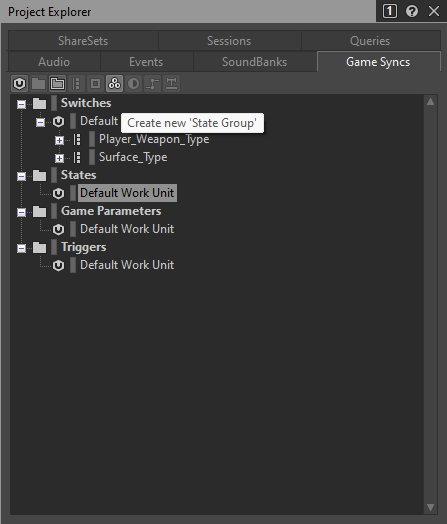
- We'll need a way to define which is the current game context. We'll create and own State to track this context. Got to the Project Explorer's Game Syncs tab, create a new State Group and give it a meaningful name:
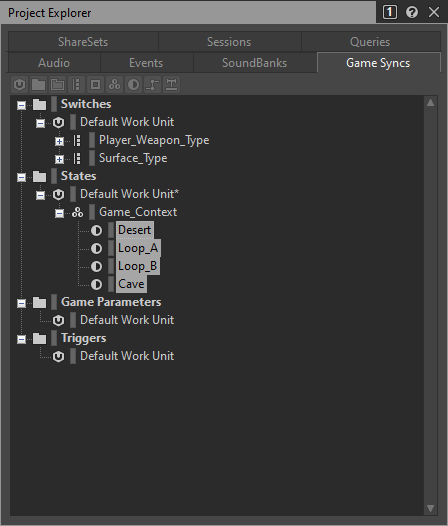
- Create an State for the 4 possible ambient loops we'll need to swap when needed:
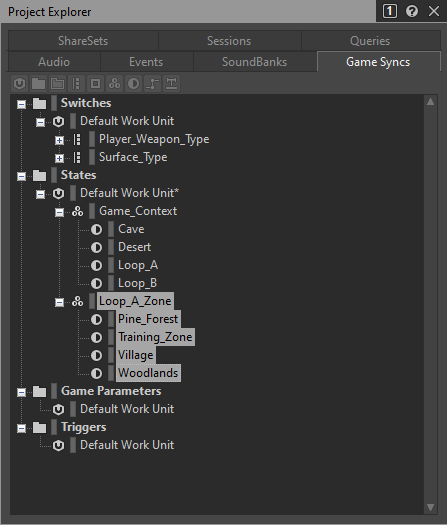
- In Loop A we'll need to know which is the current zone, so let's add another State Group for it and create the 4 possible states:
- In Loop B we'd also want to know which is the current zone but, unfortunately, we cannot get that info back from the game, so we'll be switching the 4 different layers randomly instead. No need to create an state here.
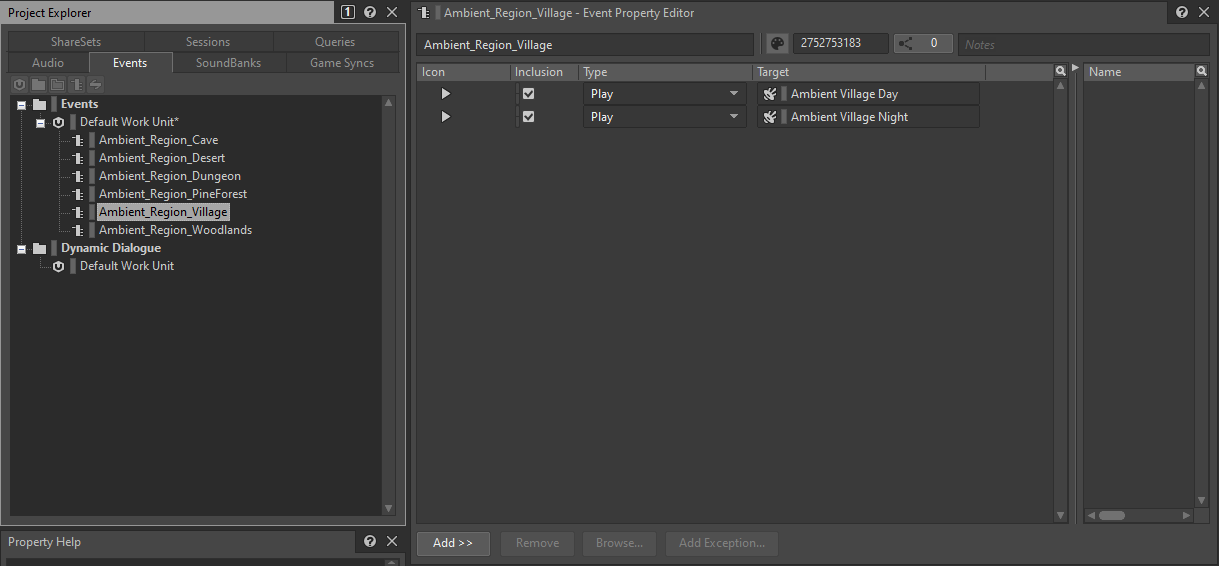
- We can use the ambient zone events to set the States we've just created. For example, we can use the Ambient_Region_Village event to set the Loop A and Village States. To do this, got to the Events tab of the Project Explorer and select the Ambient_Region_Village event. You'll probably still have the Play actions for the ambient loops:
- Now switch back to the Game Syncs tab and drag the Loop A State to the Ambient_Region_Village event's Action List. This will automatically create a Set State action with the value Loop A:
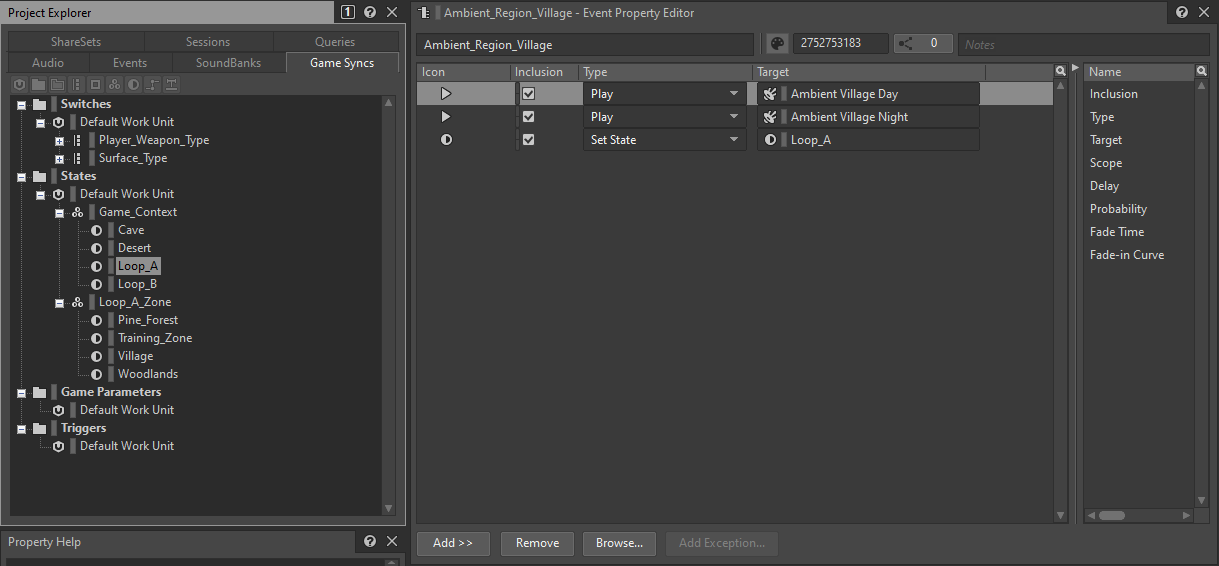
- We also want to know we're in the Village state after receiving the event, so drag the Village State to the Ambient_Region_Village event's Action List to:

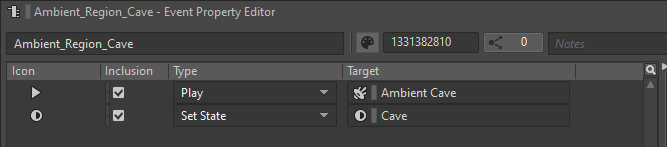
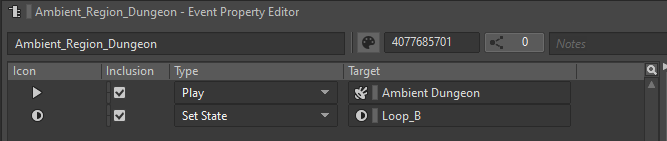
- Do the same with all the remaining ambient events, so we know if we're in either Loop A o Loop B, Desert or Cave. In Loop A we also want to know the Loop_A_Zone State as we did in the previous point. In all the other cases we just need to set the Game_Context State. Here are some examples:
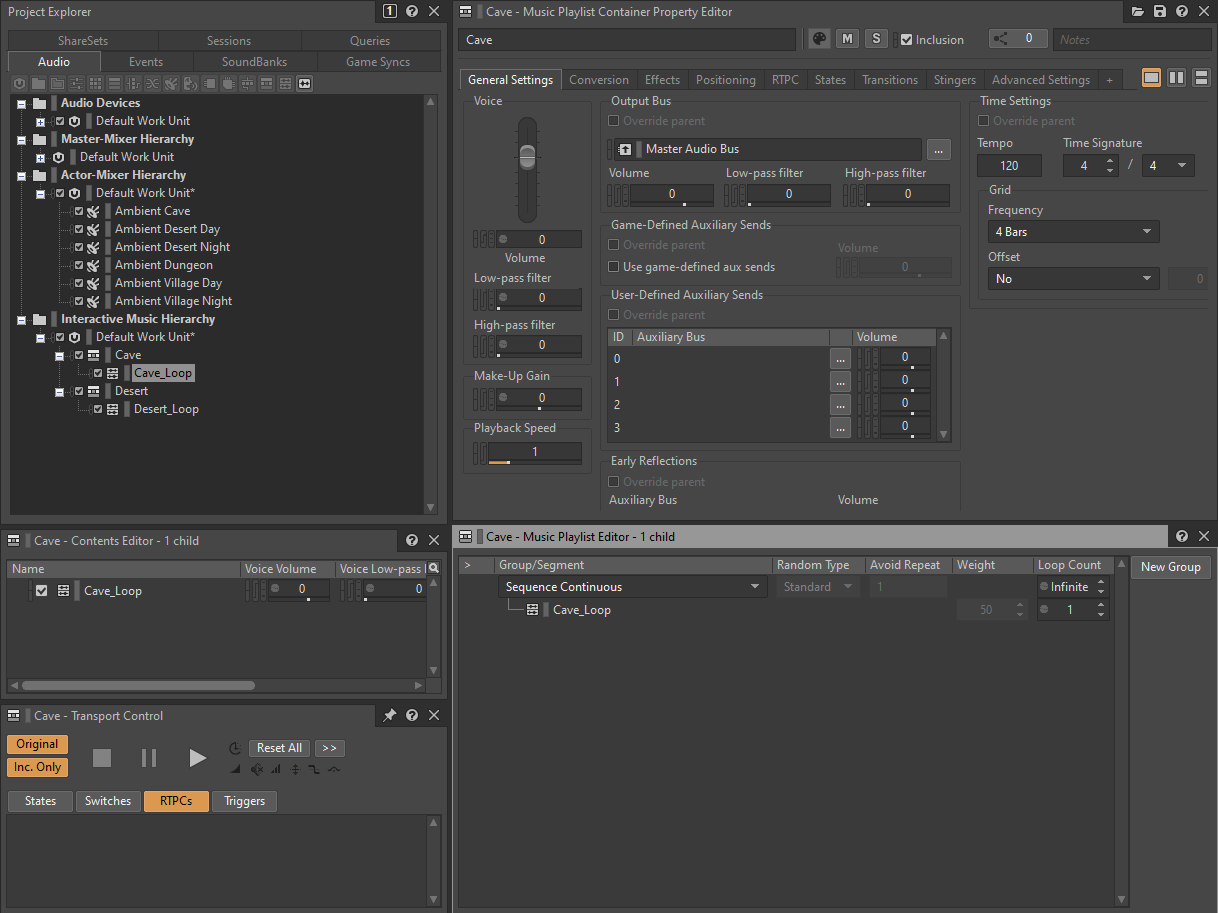
- We should have all the States set by now, it's time to import the tracks. For Desert and Cave we have no subtracks, we just need to import the tracks as Music Segments, set their music properties and put them in a Music Playlist Container to play them looped:
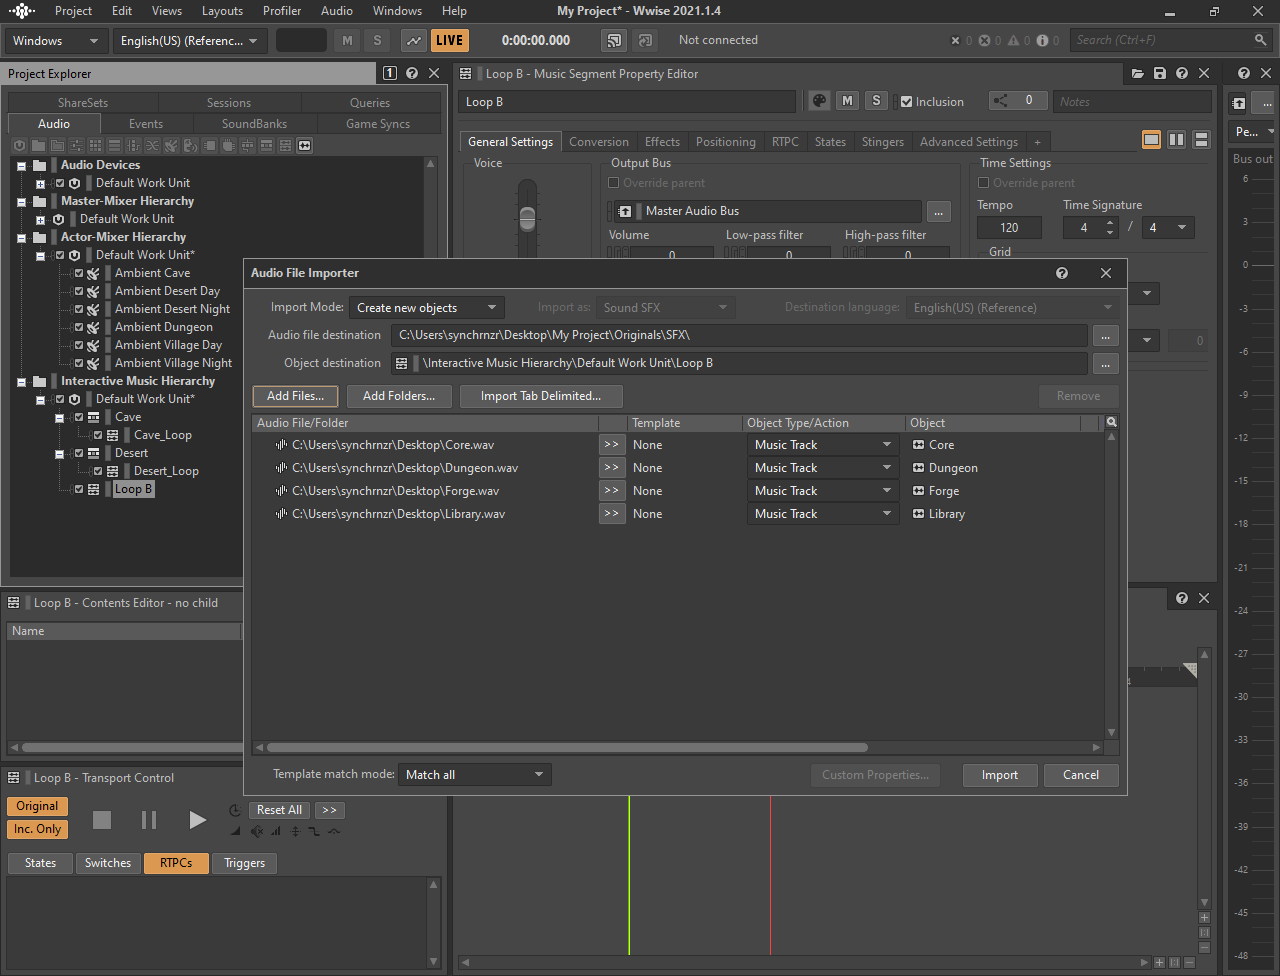
- For Loop B tracks, we'll have a single Music Segment. We can import the common loop file first as a Music Segment and then import the remaining files as Music Tracks into that Music Segment
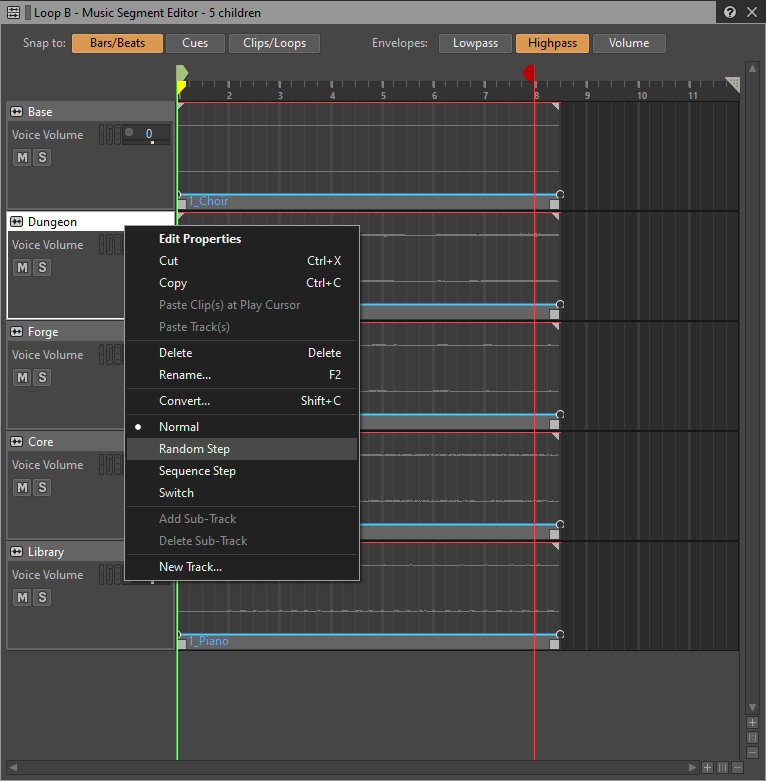
- In Loop B we don't know how to change between the different zone layers, so we'll make a Random Step out of any of the imported tracks (except the Base one):
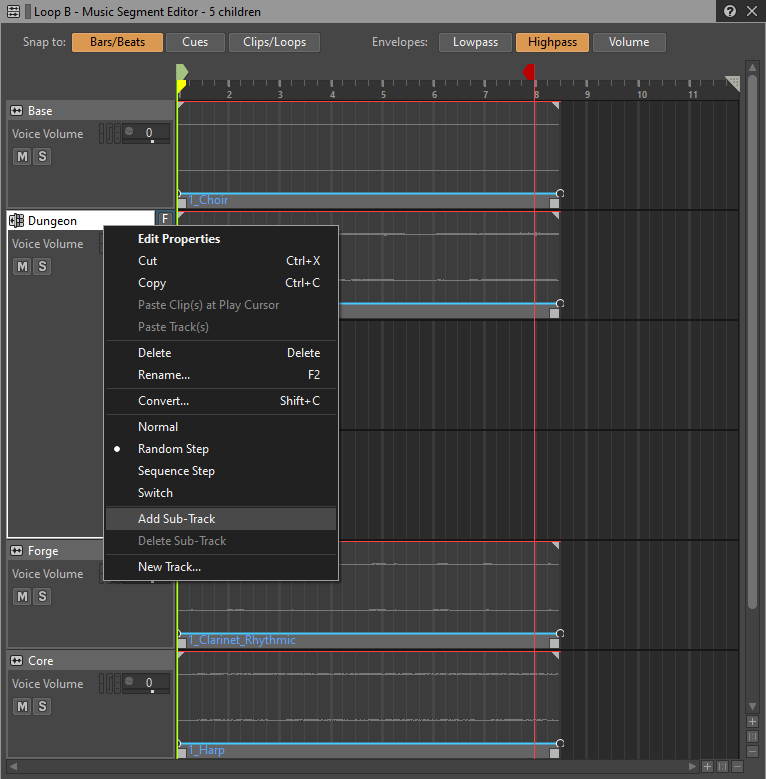
- Add 3 Subtracks so we can drag the other Audio Clips in:
- Drag the Audio Clips of the remaining tracks to the newly created Subtracks:
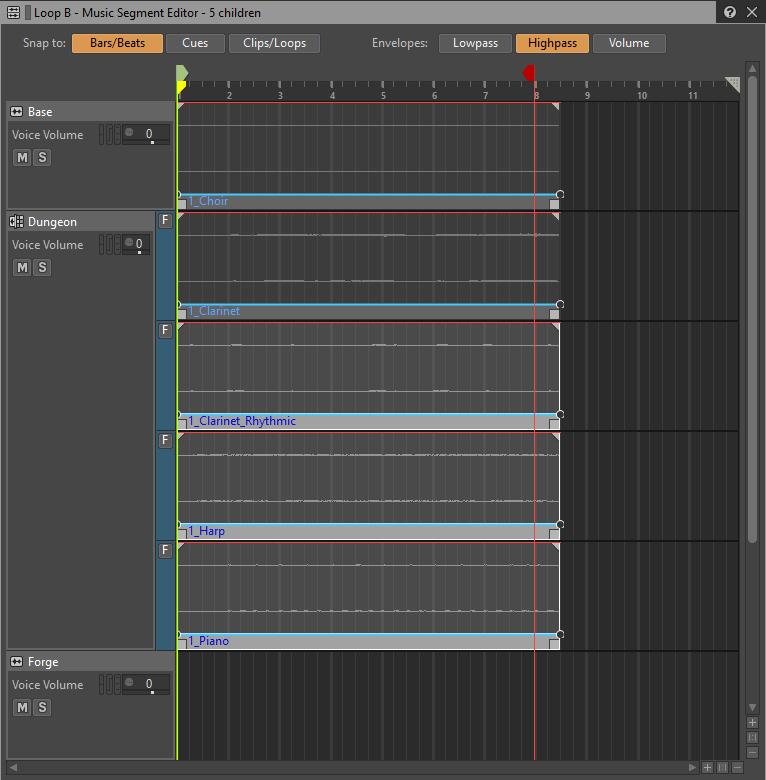
- You can now remove the empty Music Tracks:

- Finally you should put the Music Segment in a Music Playlist Container to play them looped as we did in the previous points:

- We can now proceed with Loop A. We'll need to have one Music Segment with the 4 Music Tracks in and their music properties set. You can do the same steps we used to import Loop B:
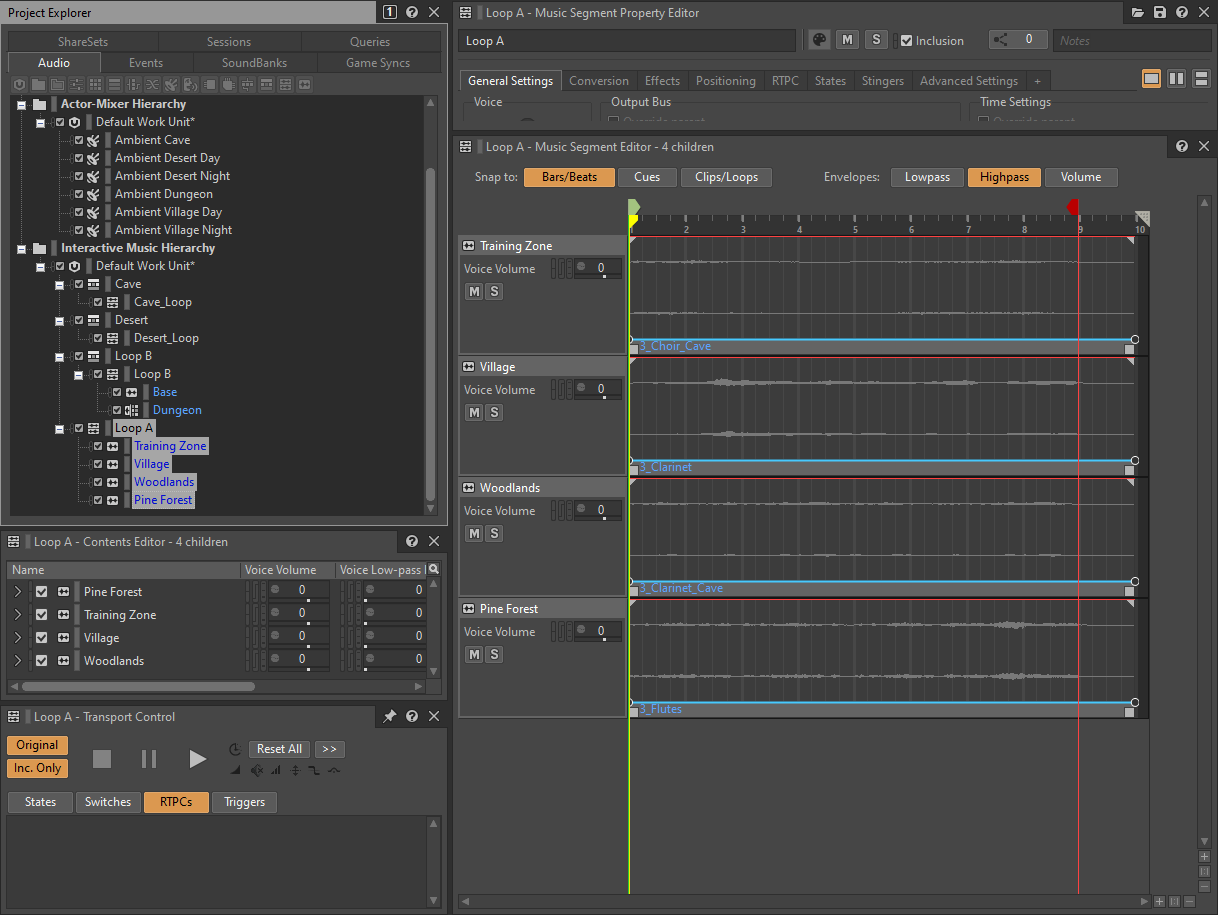
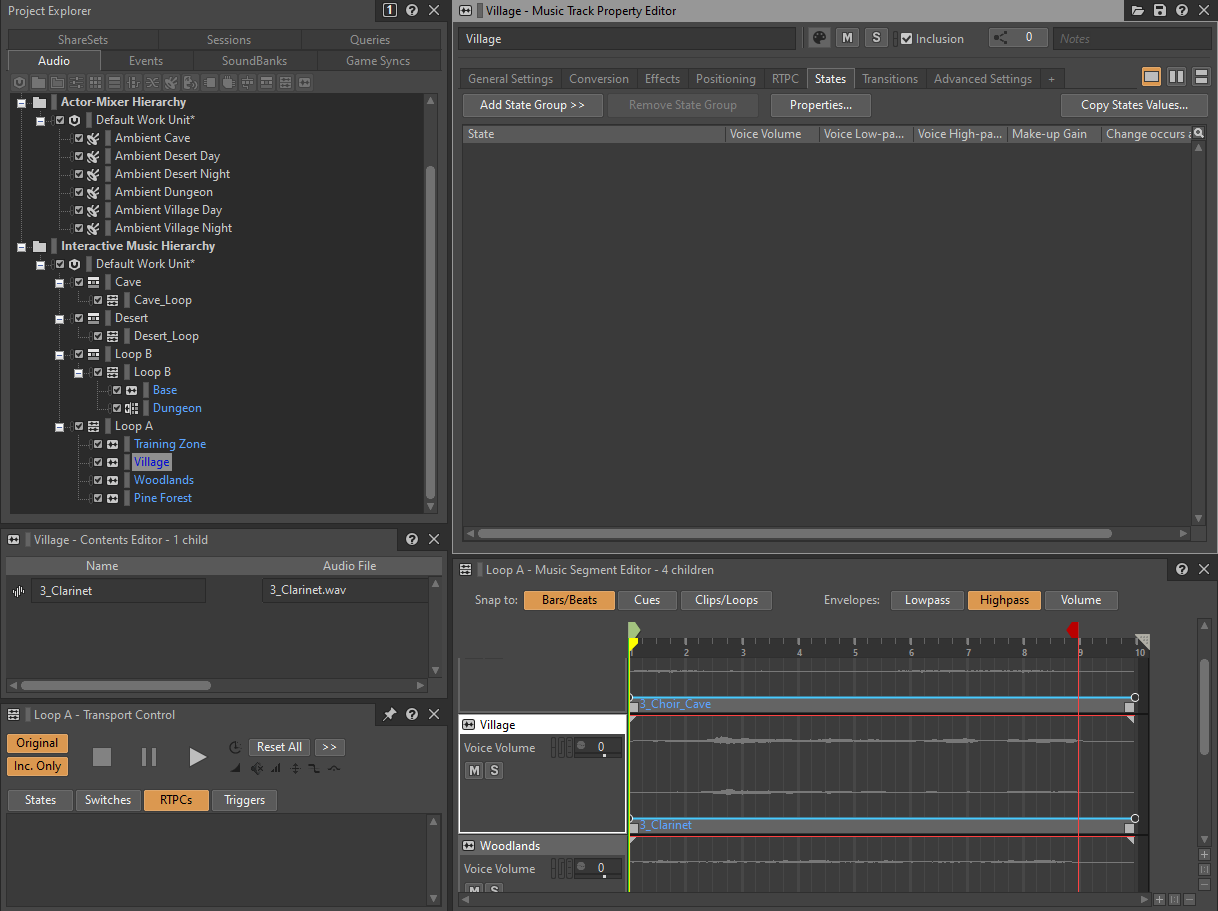
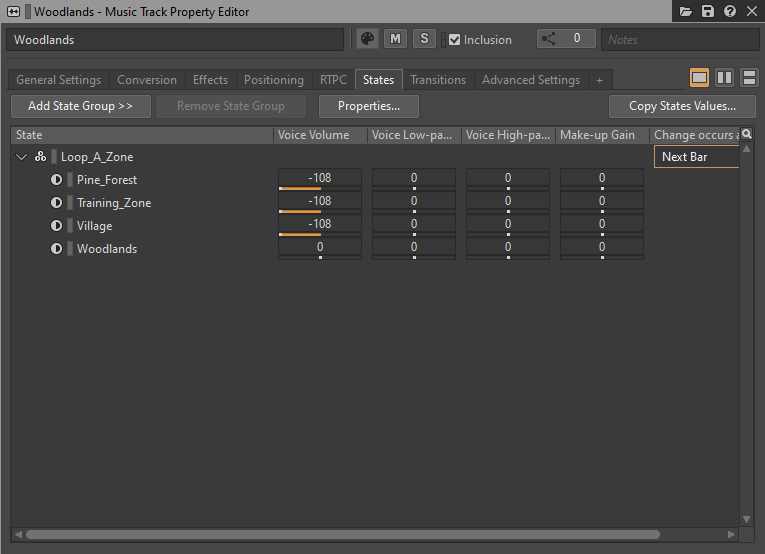
- In order to connect the presence of each track with the Loop_A_Zone State we can use the States tab in the Property Editor of each Music Track. We'll skip Training Zone as this always sounds as a base track, so we'll start with Village:
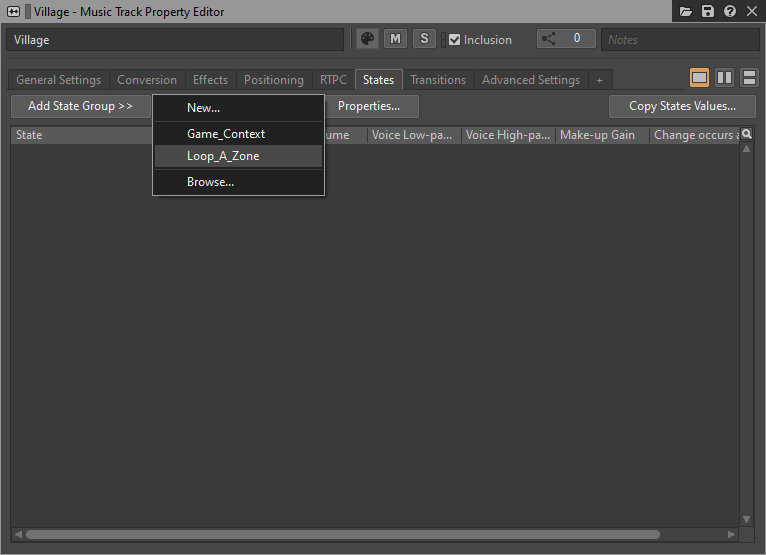
- Click the Add State Group >> button and choose the Loop_A_Zone:
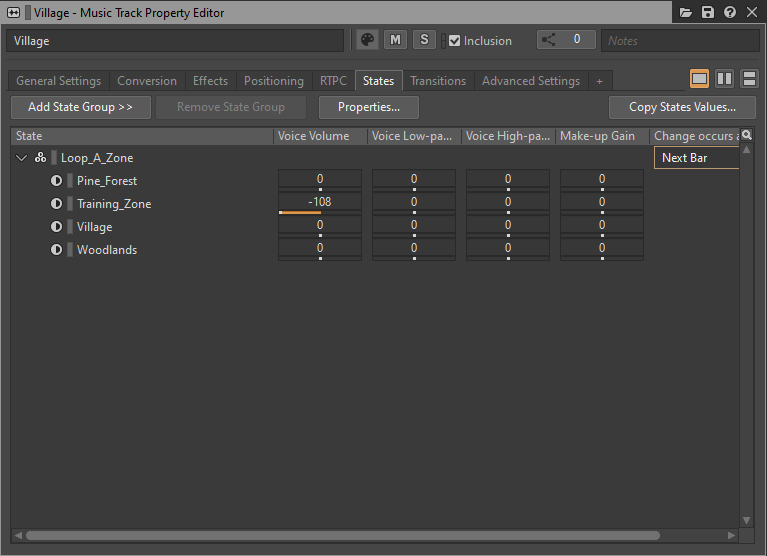
- Set the volume of the Village Music Tracks for each Loop_A_Zone and also set the Change occurs at to something smoother than the default Immediate value:
- Do the same with Woodlands and Pine Forest. Those are silent except when the state tells us we're in any of them:
- Put the Music Segment in a Music Playlist Container to play them looped as we did in the previous points:

- The last step is setting up the change between the different playlists depending on the Game Context State. We'll create a Music Switch Container and put all the Music Playlist Containers inside it:
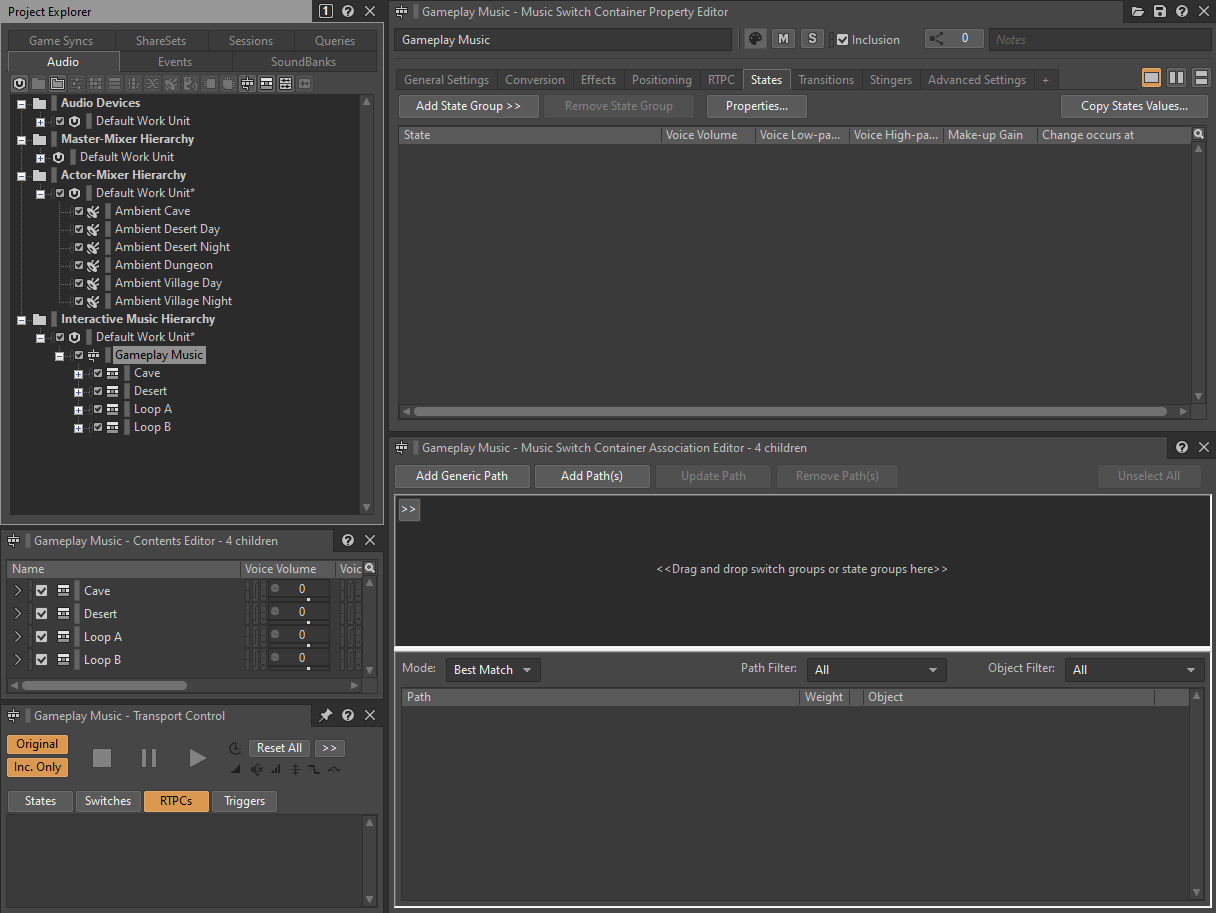
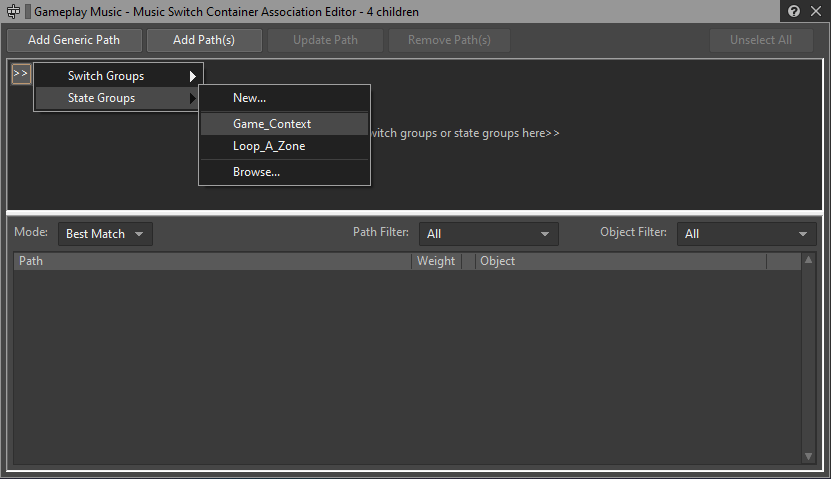
- Now click the >> button in the Music Switch Container Association Editor and choose the Game Context State:
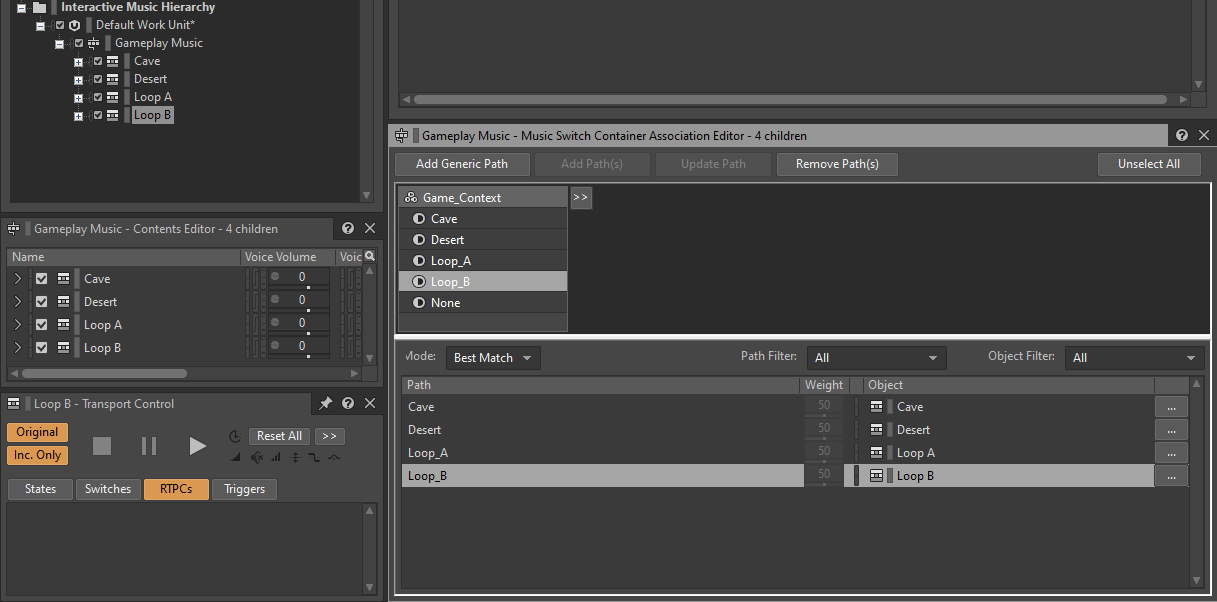
- Drag each Music Playlist Container to the corresponding value in the Music Switch Container Association Editor, so we associate each playlist with the appropriate State, we'll end up having 4 Paths in the list:
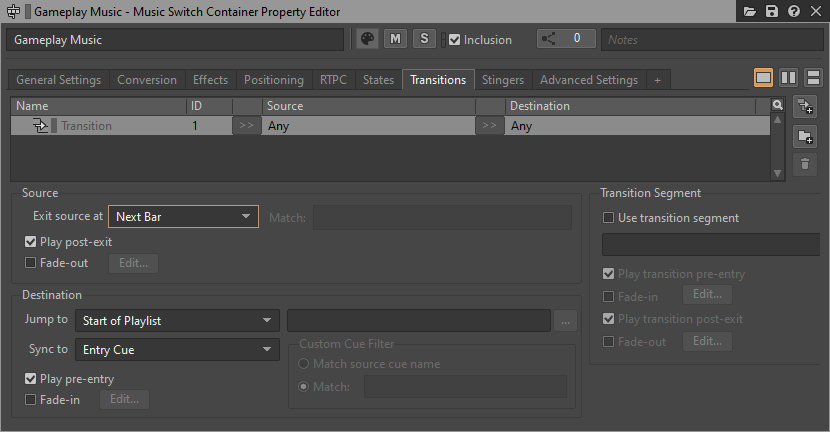
- We're nearly done! You can now set the transitions in the Transitions tab of the Property Editor of the Music Switch Container:
- Finally add the Play Action to the Music_Region Event (create it if required):

- Test everything in the game and adjust the transitions with the values you feel that better suit the changes.
Integrating Stingers
The Stinger_GetWeapon and Player_Death events are intended to trigger a stinger over the current music. We can set them up quite easily. Let's see and example with Stinger_GetWeapon:
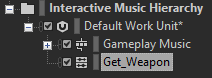
- Import the audio file for the Stinger_GetWeapon event as a Music_Segment:
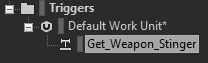
- Create a Trigger for the stinger in the Project Explorer's Game Syncs tab:
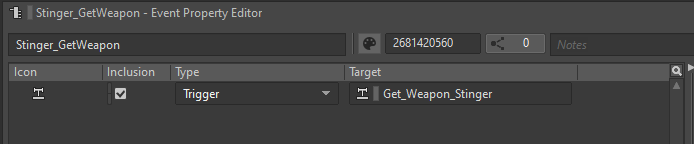
- Create the Stinger_GetWeapon event in the Project Explorer's Events tab, the switch back to Game Syncs and drag the Trigger you've just created to the event's Action List:
- Now go to the Project Explorer's Audio tab, select your main Music Switch Container and open the Stingers tab in the Property Editor:
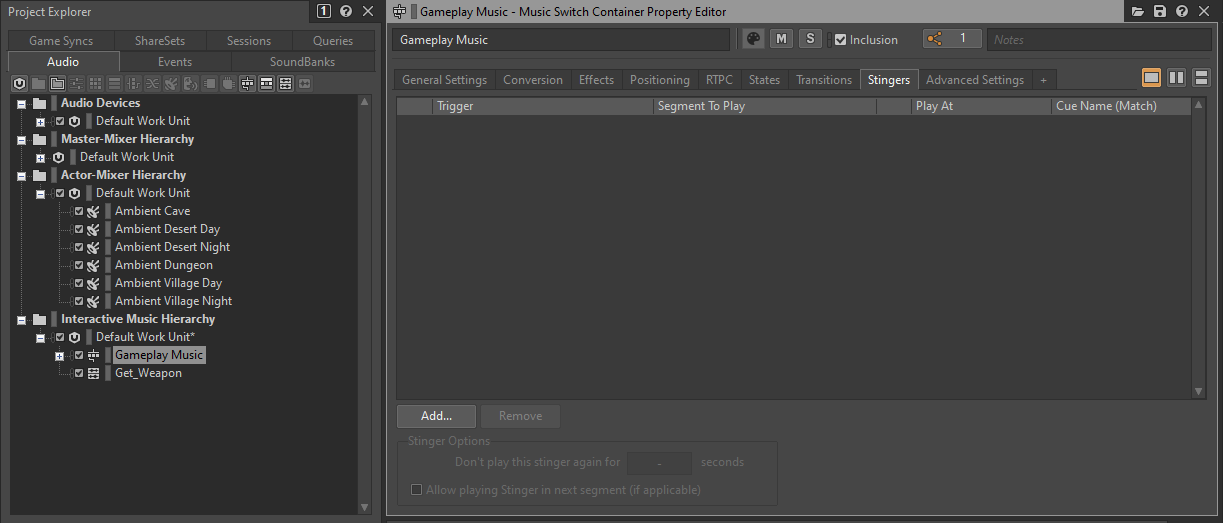
- Click the Add... button to add a new row to the Stingers list:
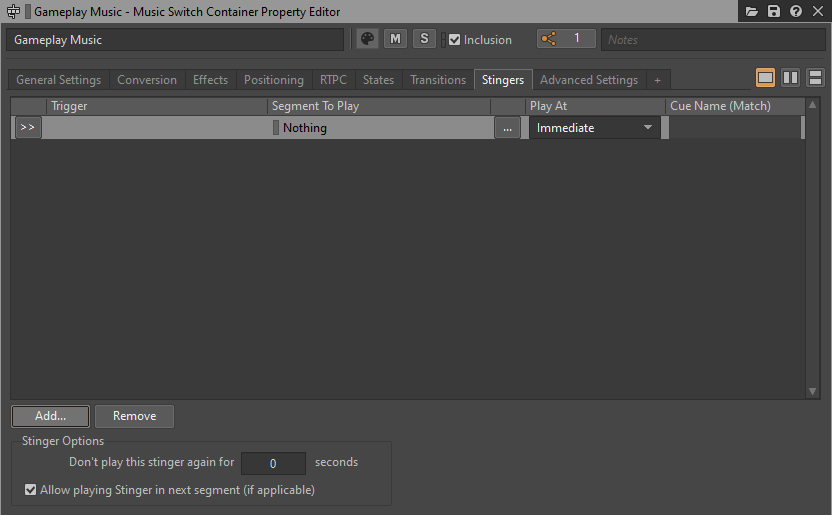
- Click the >> button in the newly created row and choose the Trigger you created before:

- Drag the Music Segment from the Interactive Music Hierarchy to the Segment To Play column:

- That's all! Don't forget to add the Event to the General soundbank and test it into the game.